CONNECTING TO THE DEX EXCHANGE HYPERLIQUID
Link to register on the Hyperliquid DEX exchange: https://app.hyperliquid.xyz/join/MOONBOT
If you register WITHOUT this link, the MoonBot terminal will automatically enter its code when you first launch it.
Using this link/code gives you a small discount on the commission and allows you to activate MoonBot PRO.
You can trade on the Hyperliquid DEX exchange using a regular DeFi wallet, but you will need an EVM (Ethereum Virtual Machine) wallet, which is a digital wallet designed to interact with the Ethereum blockchain and other EVM-compatible blockchains.
If you do not yet have an EVM wallet (e.g. Rabby, MetaMask, WalletConnect, Coinbase Wallet), you can easily create one at https://rabby.io/ or use the corresponding extensions for these wallets in Google Chrome. For more information on how to connect to the Hyperliquid exchange, please visit this page: https://hyperliquid.gitbook.io/hyperliquid-docs/onboarding/how-to-start-trading.
After downloading the browser wallet extension, create a new wallet in it, set a password, and write down a unique secret phrase (set of words) to restore it. Warning! Anyone who has access to your wallet password or secret phrase can access your funds, so do not share this information with anyone. It is best to write it down on a separate USB stick or piece of paper and keep it in a safe place.
Transfer ETH to the wallet you created on the Arbitrum network and exchange ETH for USDC within the wallet on the Arbitrum network, leaving a small amount of ETH (equivalent to $10) in the wallet for the commission (gas) that will be deducted when you deposit USDC from your wallet to the Hyperliquid exchange.
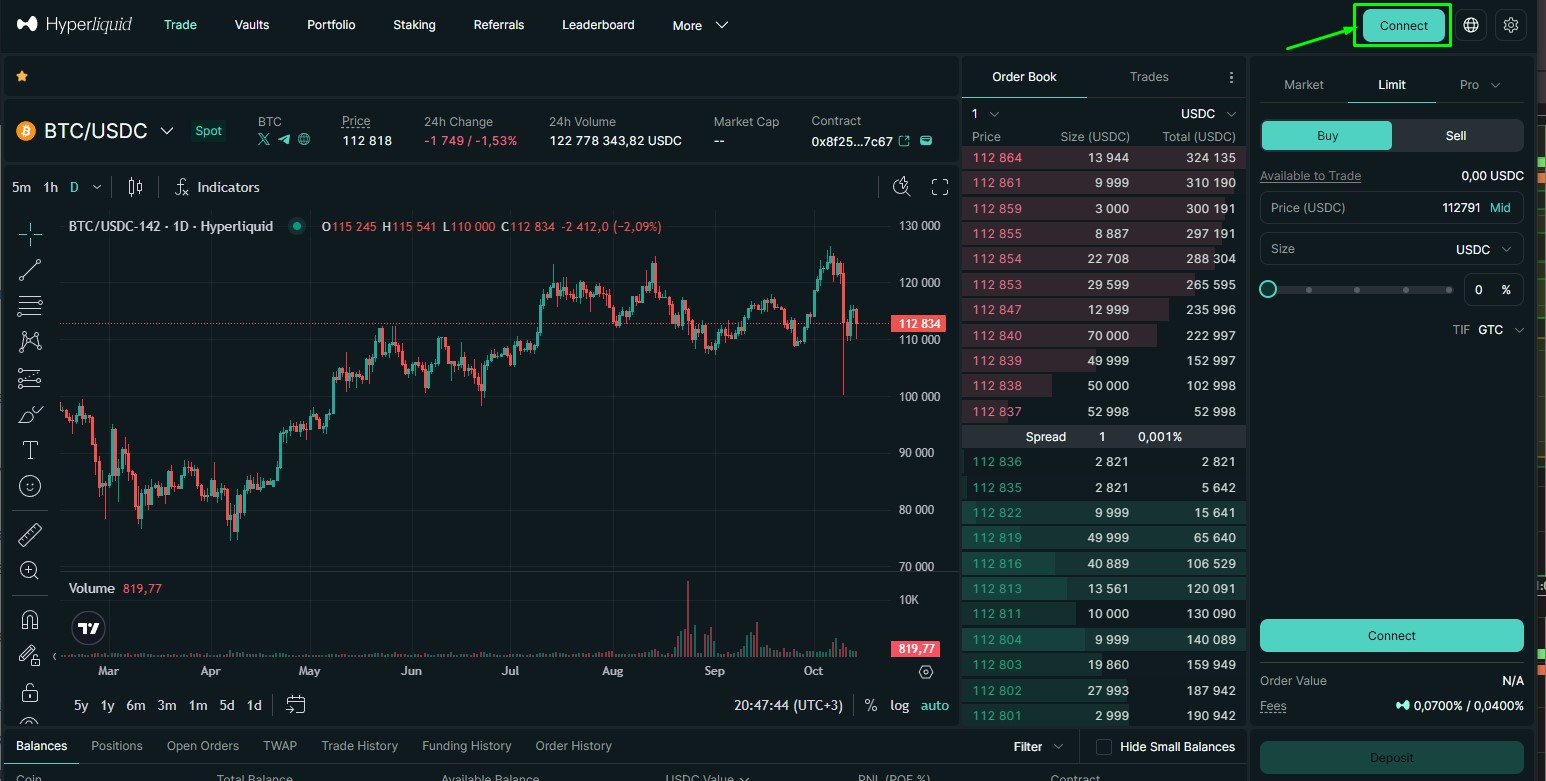
Open the Hyperliquid exchange at this link: https://app.hyperliquid.xyz/trade and click on the Connect button to connect to your browser wallet. Below are examples of connecting to MetaMask, but you can follow similar steps with other wallets that are convenient for you.
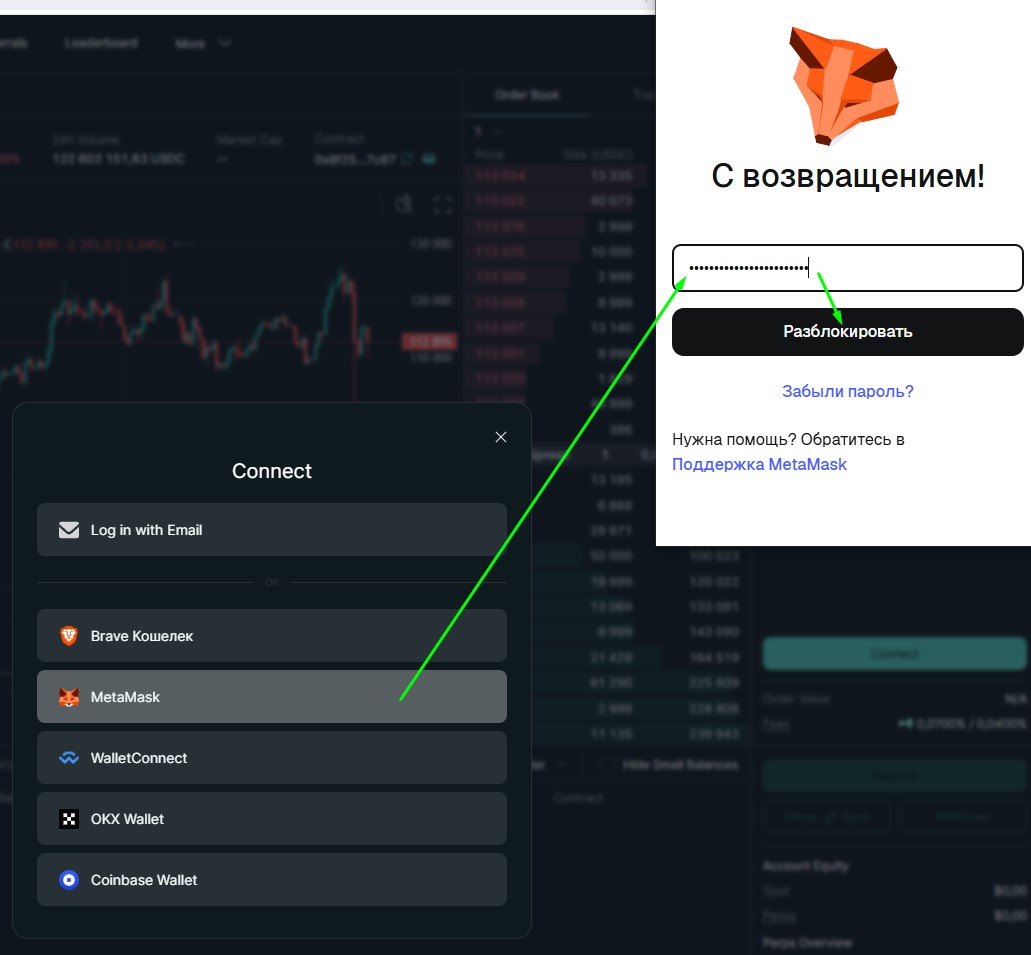
In the Connect window, click on Metamask, after which a window with the MetaMask browser wallet will open. If necessary, enter your password and click the Unlock button. If there is no item with your wallet in the Connect window, click on WalletConnect and authorise the wallet using the QR code.
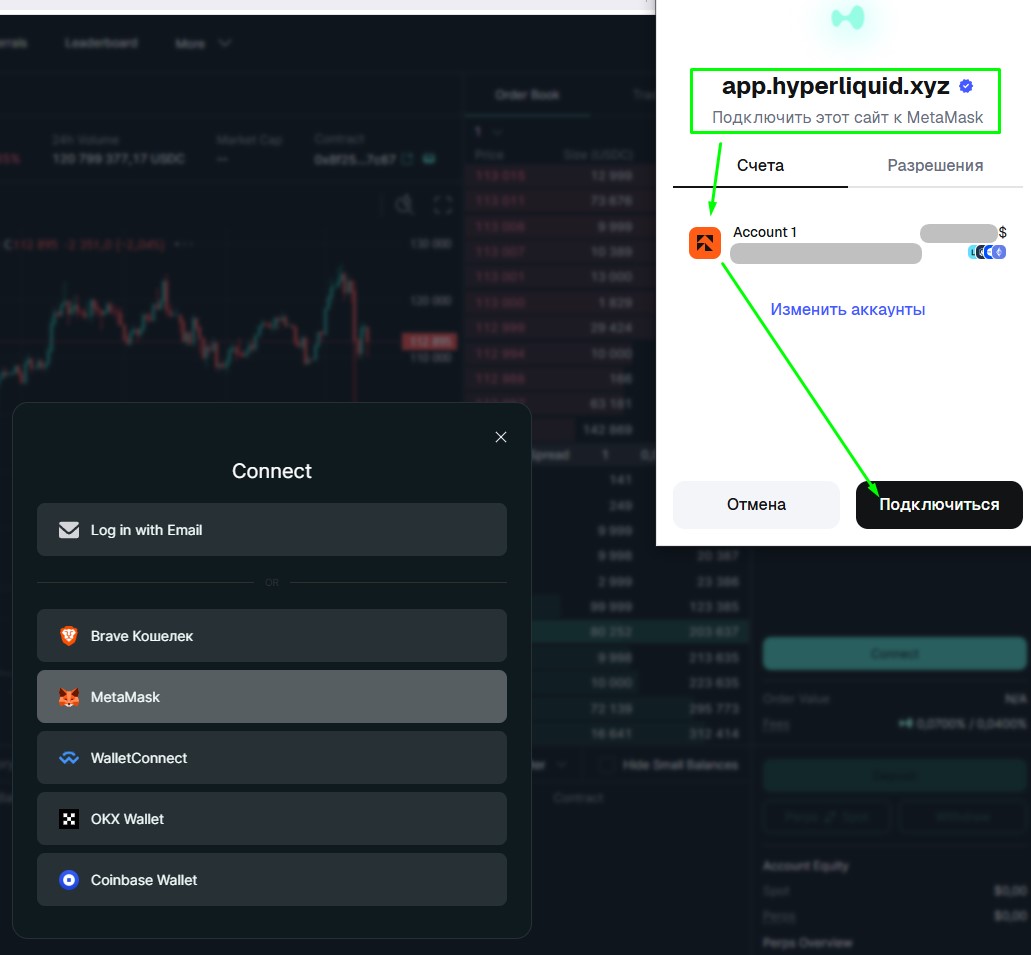
Next, create and then select the desired account in the wallet that will be connected to the Hyperliquid exchange, and then click on the Connect button.
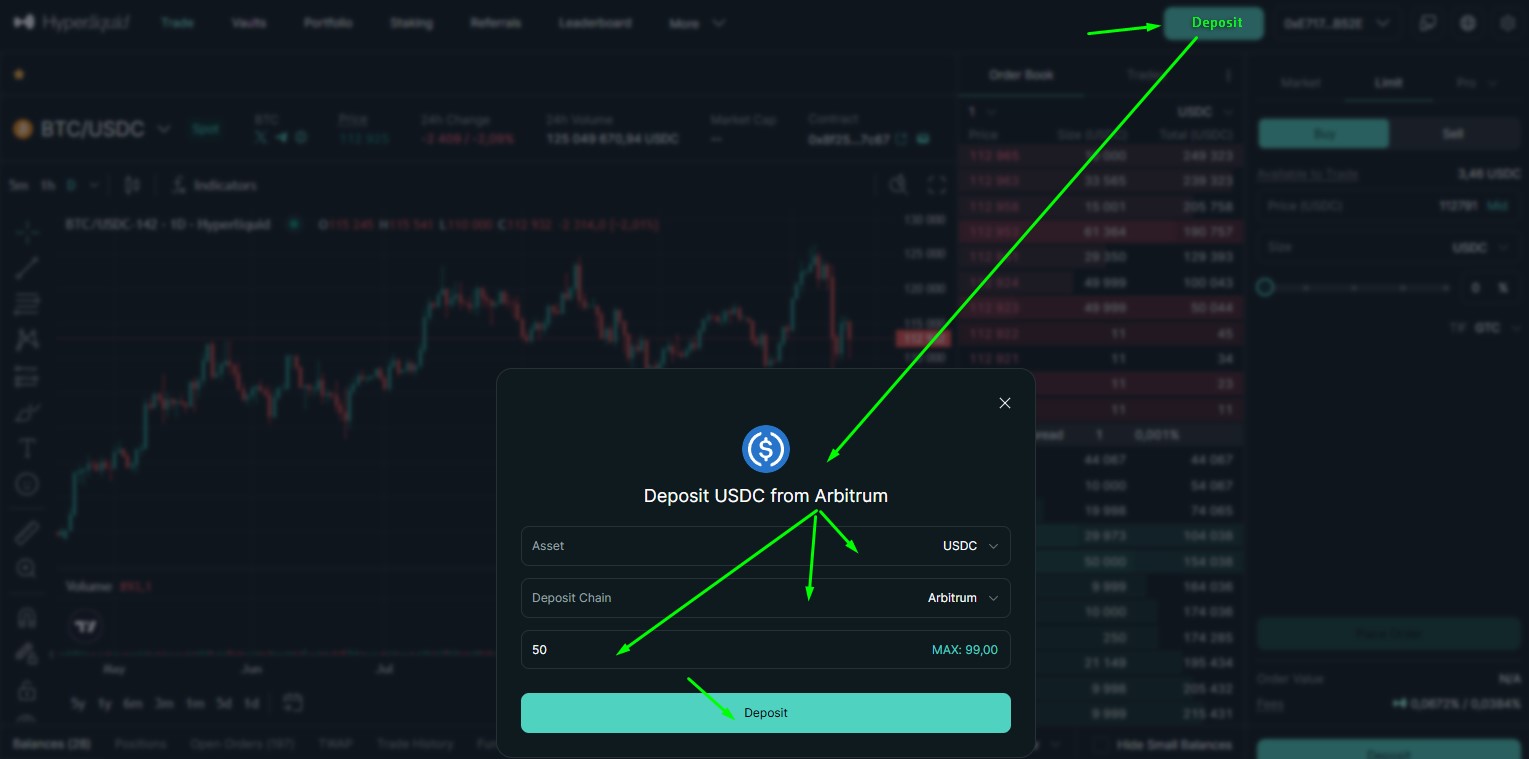
After successful connection, a Deposit button will appear on the Hyperliquid website, and your trading address on the exchange will be displayed to the right.
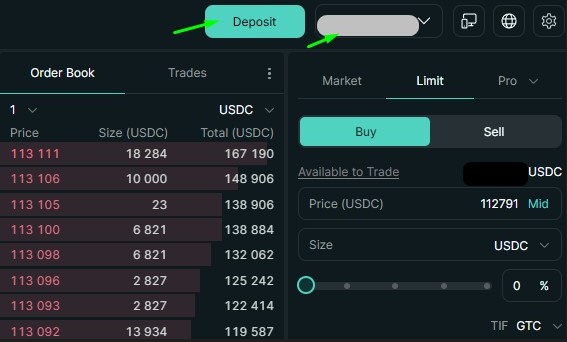
Click on the Deposit button and in the Deposit USDC from Arbitrum window, set:
- in the Assets menu - USDC
- in the Deposit Chain menu - Arbitrum
- in the lower field, set the amount in USDC that you will send from your wallet to the Hyperliquid exchange (minimum amount is 5 USDC). If you click on MAX, the field will be set to the maximum amount of USDC available in your wallet.
Then click on the Deposit button.
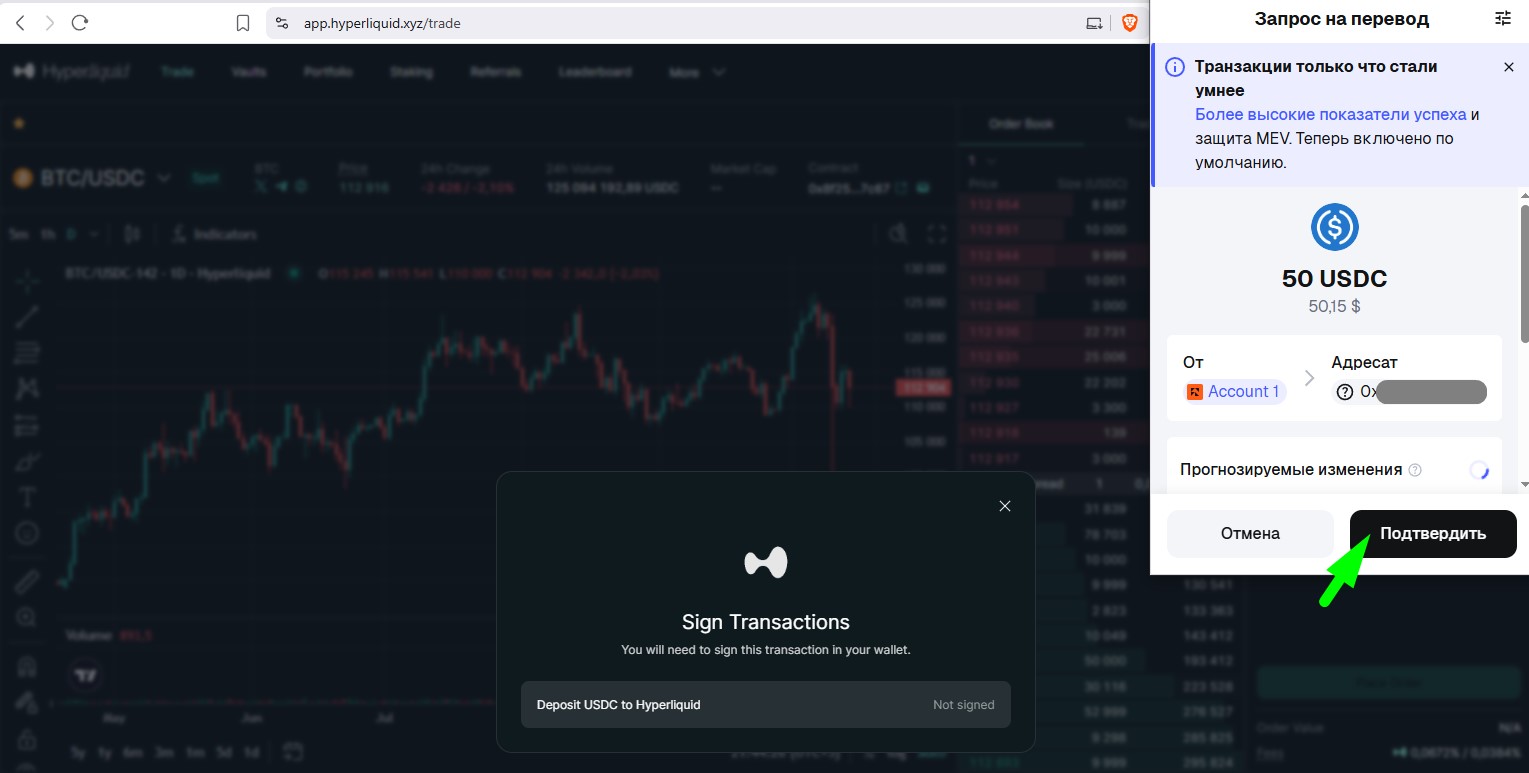
After that, a wallet will open, where you need to click on the Confirm button to confirm this transaction. Please note that your wallet balance must also contain some ETH, which is used for the commission (gas) for this transaction.
After completing the transaction in your wallet, click the Close Extension button.
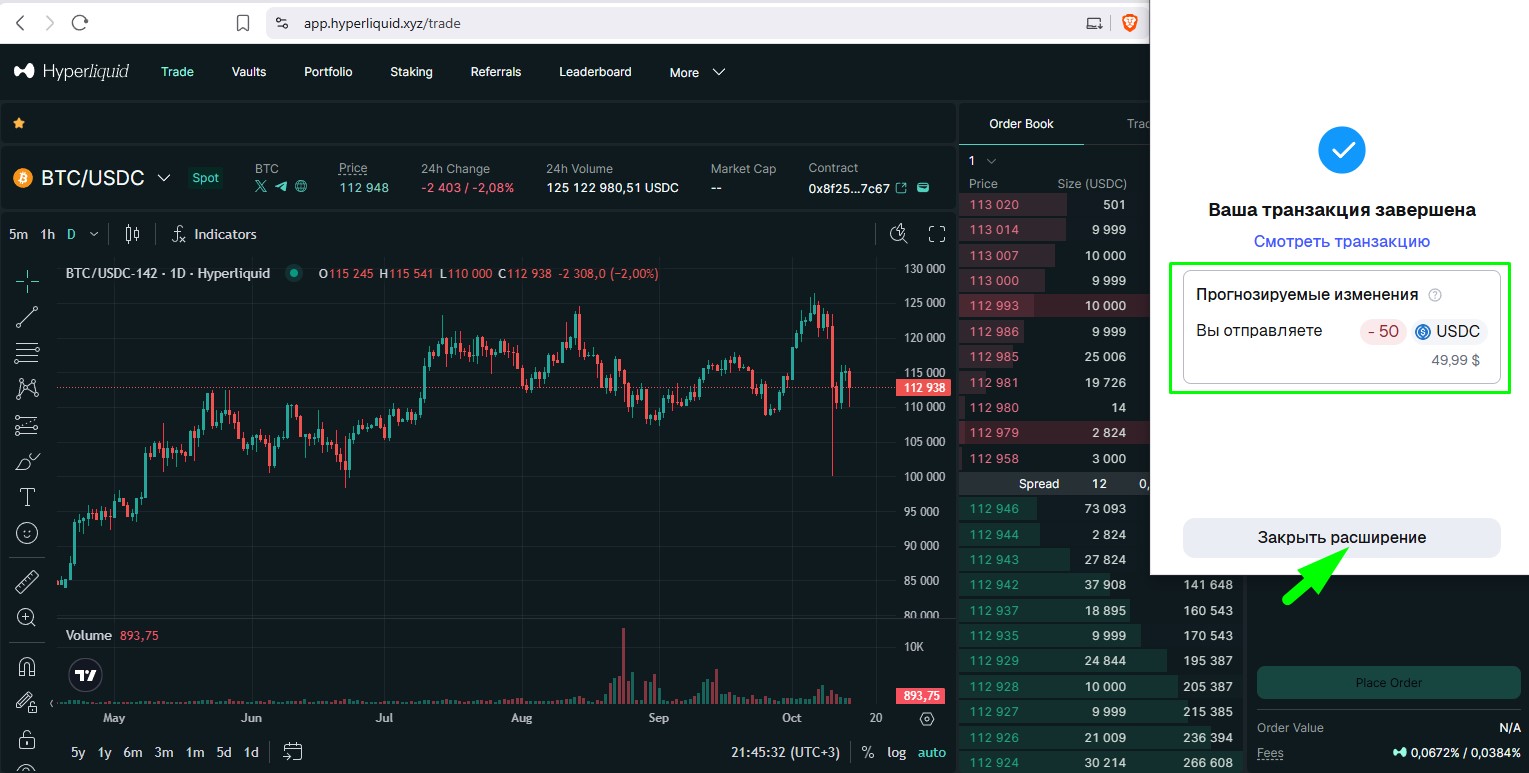
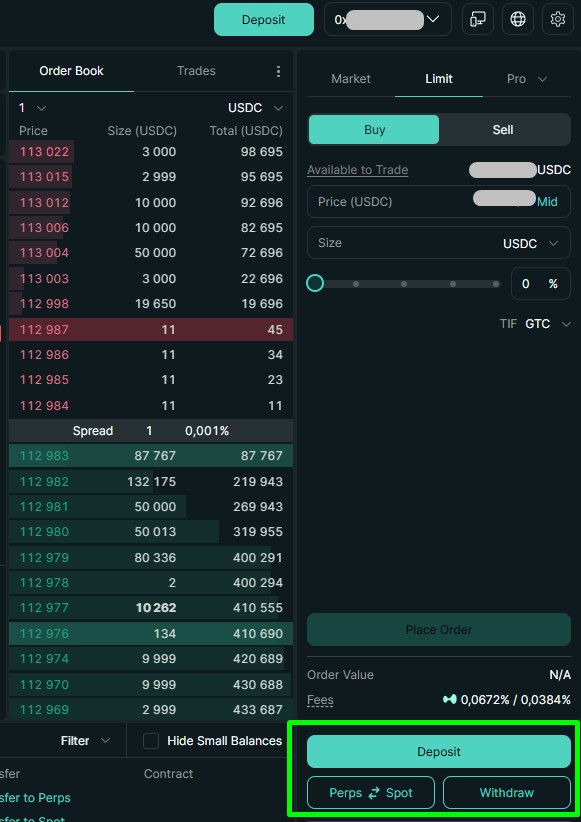
After that, this amount in USDC will appear on the Hyperliquid exchange on the futures balance (Perps). You can transfer funds from the futures balance (Perps) to the spot balance (Spot) on the Hyperliquid exchange using the Perps-Spot button with confirmation of the action via your wallet. Here, you can also replenish your deposit using the Deposit button or withdraw funds using the Withdraw button back to the wallet connected to the exchange with a commission of 1 USDC.
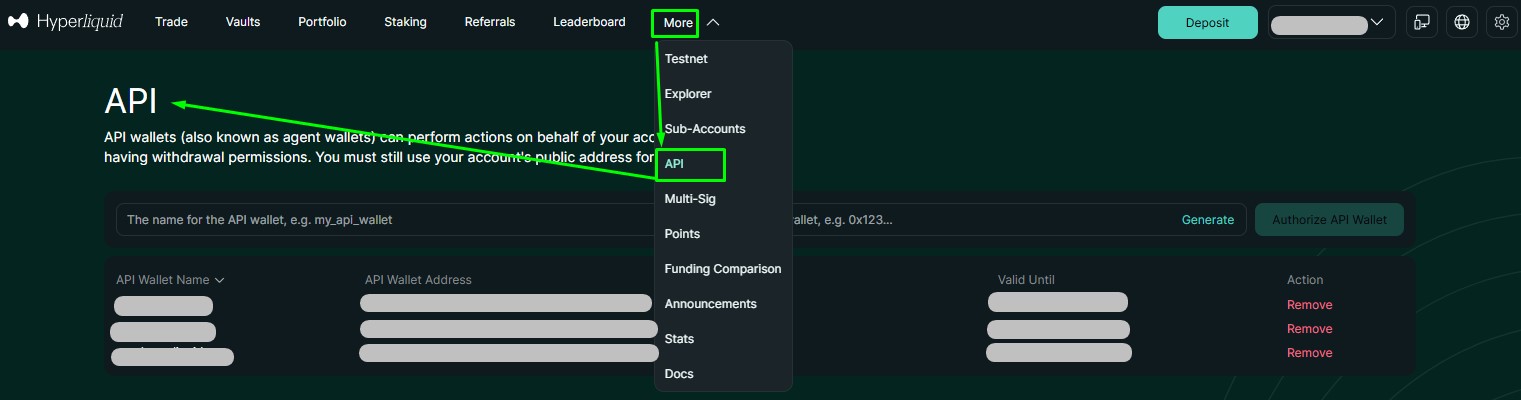
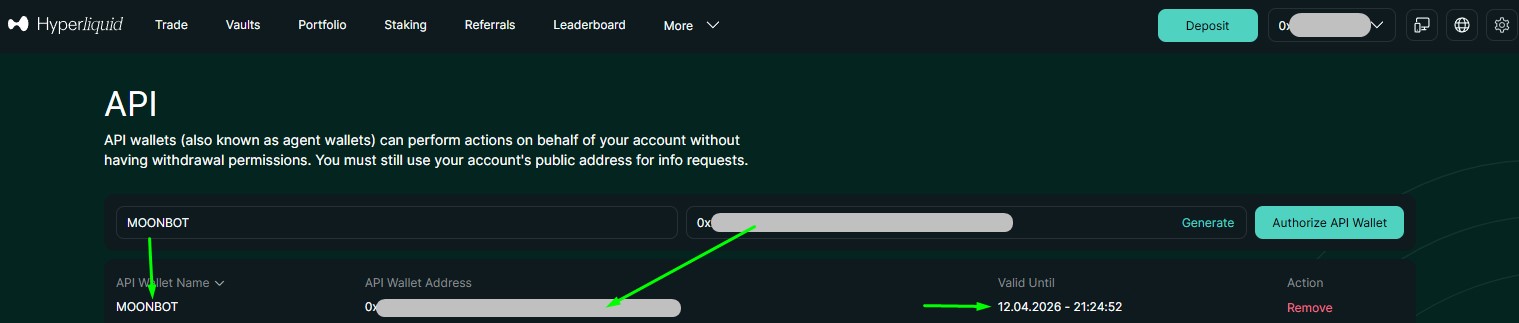
After replenishing your balance on the Hyperliquid exchange website, click on the More tab, select API to open the page for creating API keys.
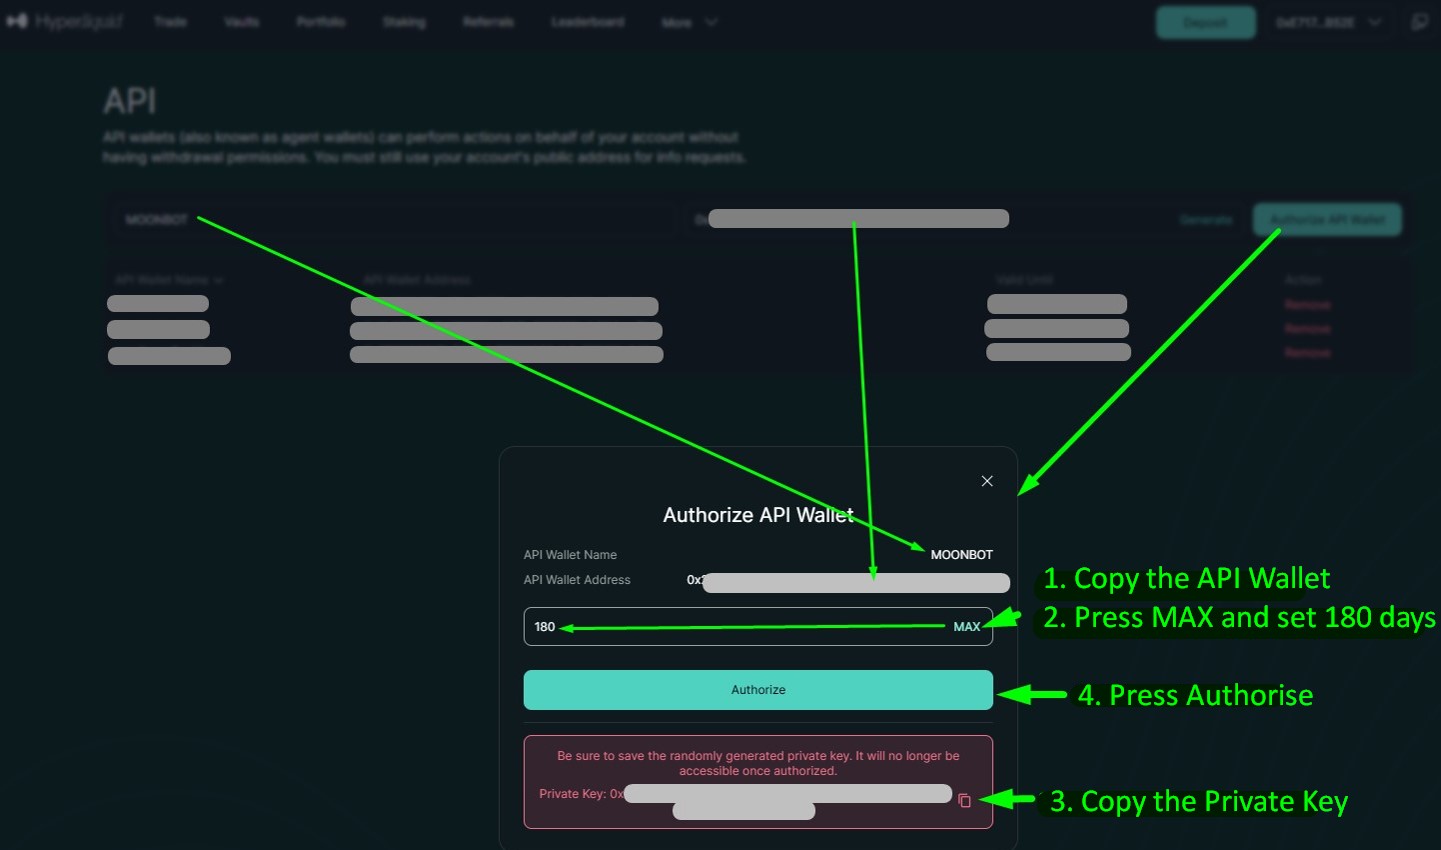
In field 1, enter any name you like for the API keys (no more than 16 characters) and click button 2 Generate.

The API Wallet Address will be generated in field 3. Click on button 4 Authorise API Wallet.

Next, the Authorise API Wallet window will open, which will display:
- API Wallet Name, which you previously specified when creating the API
- API Wallet Address, which you need to copy or write down on paper (it will be required in the MoonBot terminal).
In the field below, you can set the number of days this API will be active. If you click on MAX, the field will be set to 180 days (the maximum possible period).
- In the red field, you need to copy or write down the Private Key (you will need it in the MoonBot terminal).
Then click on the Authorize button.
After that, a wallet will open, where you need to confirm the signature request for creating API keys for the Hyperliquid exchange using the Confirm button.
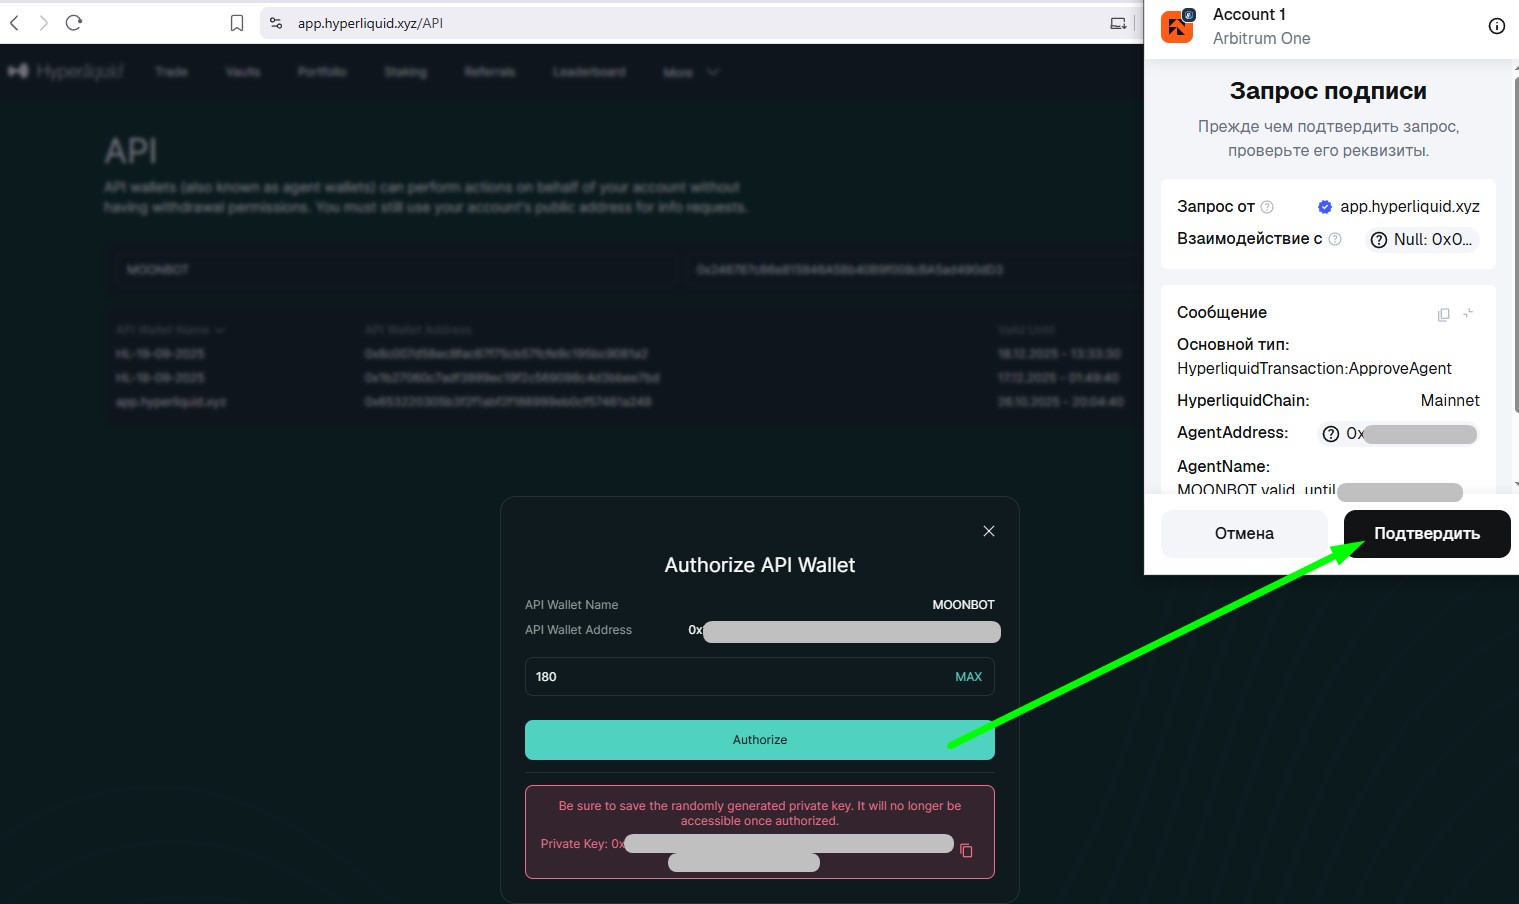
After that, the API page will display a record with the created API keys and their expiry dates, and another technical API named "app.hyperliquid.xyz" will be automatically generated below (it will not be used in the terminal, but you do not need to delete it from the API table on the website). You can delete your unwanted API key by clicking on the red word Remove.
Procedure for activating API keys in the MoonBot terminal for the HyperLiquid exchange:
1. Create keys for your main account or additional account on the Hyperliquid API exchange website.
2. Copy the folder with your main PRO terminal from another exchange to a new folder and launch it.
3. On the Settings - Login tab in the "Exchange" menu, select Hyper (spot) or Hyper Futures (futures) and click the "Apply" button.
4. On the Settings - Login tab:
- in the terminal's "API Key" field, enter the API Wallet Address you received earlier on the Hyperliquid exchange.
- in the terminal's "API Secret" field, enter the Private Key you received earlier on the Hyperliquid exchange.
and register the API keys entered from your main account or additional account.
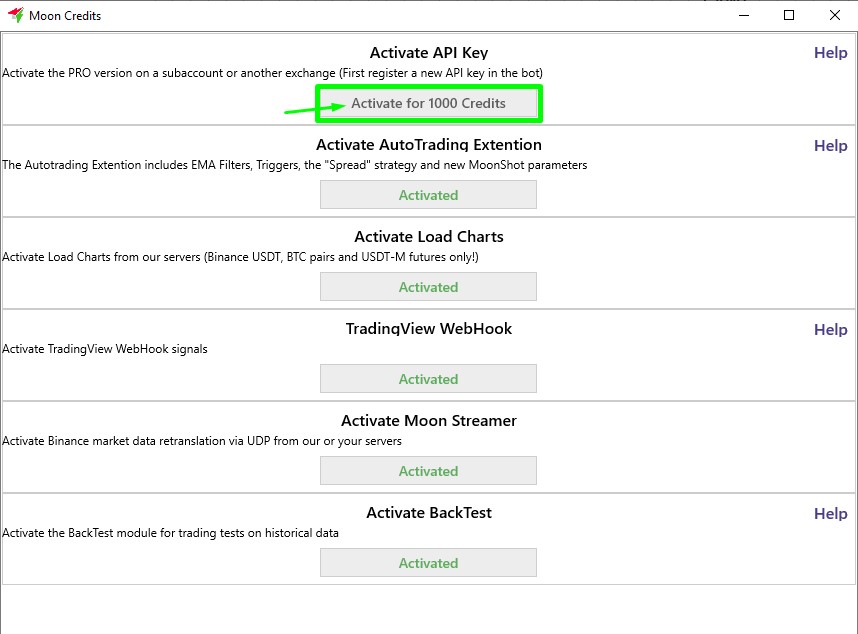
5. Click on the PRO version label in the lower right corner of the MoonBot terminal main window to open the Moon Credits window with paid module activations.
6. The Moon Credits window at the bottom will show your Moon Credits balance. To activate your main account or each subsequent additional Hyperliquid exchange account, you need to have 1000 Moon Credits. If your balance is sufficient, click on the "Activate for 1000 Credits" button under "Activate API Key". After that, the API keys for the main account or additional account will be activated in this terminal.
7. If you need to activate other additional accounts from the same exchange, repeat this procedure as many times as necessary.
8. If there are no trades or no order book in the terminal after connecting, try clicking Menu - Refresh Connection or restarting the MoonBot terminal several times until they appear.
Technical details when working with the HyperLiquid exchange:
1) Commissions when trading on the Hyperliquid exchange can be charged in both USDC and tradable coins. The exchange's commission rates and options for reducing them are listed on this page: https://hyperliquid.gitbook.io/hyperliquid-docs/trading/fees.
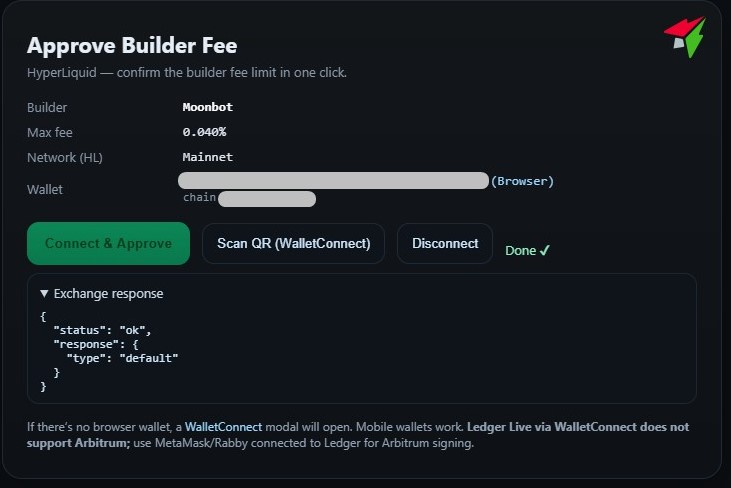
In addition, a small commission is charged by the MoonBot terminal developer (a feature of working with this exchange), which is activated when the MoonBot terminal connected to the Hyperliquid exchange is first launched.
That is, after the first launch of the terminal, an API key error message may appear, and the page https://api.moon-bot.com/files/HLsign.html will open in your browser with the Approve Builder Fee window, in which you need to click on the green Connect & Approve button. Then a browser wallet will open, in which you need to confirm your consent to activate the developer's commission. If successful, the Approve Builder Fee window will display the status Done. Next, restart the MoonBot terminal in administrator mode. This procedure only needs to be done once per account, and you will not need to repeat these steps when launching other copies of the terminal in the future.
2) Strictly adhere to the rule ‘One API key = One terminal = One launch’!
(* regardless of whether it is a connection to spot, futures, or a combination of both).
Violation of this rule will result in a malfunction of all terminals running on the same API from this exchange.
Since the Hyperliquid exchange operates on the principle of monotonic command indexing, two or more MoonBot terminals with the same API will break the command chain. This means that each working terminal that is launched simultaneously (on a home computer or server) requires its own API keys.
Since the MoonBot PRO terminal will be linked to the exchange account, you can create multiple API keys for it and then register them for free in copies of the terminal.
3) The exchange limits are 1,200 requests per minute for everything — orders, trades, order books, and all technical requests in general, which is roughly comparable to the early Binance exchange.
There is also a fill ratio — 1 request for every 1 USDC of total traded funds.
The starting limit "buffer" is 10,000 orders. If it is exhausted, you will need to buy something and renew this limit, as the limit itself will not be renewed without a purchase, and the exchange will send an error when you try to place orders.
More information about the limits can be found on the Hyperliquid exchange website: https://hyperliquid.gitbook.io/hyperliquid-docs/for-developers/api/rate-limits-and-user-limits
4) On the Hyperliquid DEX exchange, you can only deposit USDC and withdraw USDC. There is a withdrawal option for other tokens, but it is done through a third-party service, i.e. it is not an ‘exchange’ in the usual sense, where you can exchange one asset for another, but simply a platform for playing on currency rates.
5) Lags ("ping") on the Hyperliquid DEX exchange are quite significant compared to CEX exchanges and can be 1-2 seconds long. You just have to accept this, as it is a DEX exchange and your orders go to the blockchain with all the ensuing consequences. At the same time, it is difficult to find where the DEX ‘servers’ are located, as they are distributed across the network, but you can try to find a faster location for your VDS (dedicated servers).
6) "Losses" — lost positions and coin balances after closing positions in the MoonBot terminal — are inevitable on this exchange! Due to the extremely raw API, you just have to accept this and remember to keep an eye on your balances in the Assets window, which can be opened via Menu-Assets. Example situation: an order for 100 coins, 90 of them were executed, status "Filled", i.e. "Closed", and 10 coins are "stuck somewhere", so check your balances after each transaction.The tracker (terminal that tracks lost positions) is working, but it is not yet clear whether tracker2 will be needed in addition to tracker1, i.e. whether tracker2 will be used to perform a second clean-up of any balances that may remain after tracker1 has closed the balances.
7) Compared to earlier versions, the loading of coin data when starting the terminal has been significantly accelerated using the "Load Charts" module and the "Analyse coins on startup" checkbox in the Settings-Main tab. In this case, the initial data comes from our server, even if you start a clean terminal.
8) Cross and Isolated margin are supported on the exchange and in the MoonBot terminal.
9) Auto-trading in the terminal on this exchange is somewhat difficult, as there are delays in placing orders of approximately 1-2 seconds, both Buy and Sell orders may be lost, there are no hourly volumes, some deltas and EMAs used for auto-trading are missing, and other nuances.
10) The secp256k1.dll file is added to the terminal folder for this exchange. It is needed to sign requests in the blockchain. Do not lose it when copying the folder with this exchange.
11) Orders are not placed on the MoonBot Free version.
12) Chart loading currently only works on futures.
13) In the Assets window, which is called up in the terminal via Menu-Assets, you can view coin balances and spot and futures balances. It is not possible to transfer funds in the Assets window between the spot and futures windows for this exchange - this is done on the Hyperliquid exchange itself with confirmation via the wallet.
14) The Huperliquid exchange does not send PNL information via API, so it always shows as $0 on the chart. You can check your PNL, trading volumes and other trading information on the exchange website under the Portfolio tab: https://app.hyperliquid.xyz/portfolio
15) Futures have a liquidation line when a position is opened, which disappears when the position is closed, as on other futures exchanges.
16) The API load indicator is working, but the values are estimated, not accurate, since the Hyperliquid exchange does not provide feedback on API usage. API load is reduced due to less frequent mark price updates (once every 6 seconds). Ping also shows order requests (as usual, the format is general ping / ping by orders).
17) You can achieve faster order replacement by checking the Ignore Replacing bug box in the Settings - Advanced - Engine settings tab.
Attention! Unlike CEX, this "replacing bug" on the DEX exchange Hyperliquid has an almost 100% probability if you move a partially filled order.
Remember that hangers on Hyperliquid will always appear everywhere, this should be taken as a given. With quick reordering, there will be many times more of them.
Reason: order rearrangement takes the total number of coins as a parameter; if partial filling occurred at the moment of rearrangement, the exchange will place an order for the amount of "the initial amount PLUS the filled amount", and this balance will hang as a short (if trading long).
18) The command (in the coin input field) LogEveryRequest logs all requests (as usual) - for debugging the reasons for bans on the exchange.
19) When a ban is received (code 429) at the moment of placing a take, 5 more attempts are made with long pauses.
20) Orders on futures are automatically placed in "ReduceOnly" mode, which does not allow you to go short when closing a long position.
21) The updating of balances on futures and, to a lesser extent, on spot markets has been accelerated, and we have managed to achieve greater depth in the order book compared to earlier versions.
22) You can create subaccounts (up to 50) on the Hyperliquid exchange, but only if your trading volume is more than $100,000 and you can use them only when trading through the exchange's web interface, but not in the MoonBot terminal due to their architecture. If you need a second and subsequent accounts that can work through the API in the terminal, you will need to create a new wallet, register it using our referral link and activate it again in the MoonBot terminal for Moon Credits, as was done for the first account.
23) General statistics for the Hyperliquid exchange can be found on this page: https://stats.hyperliquid.xyz/
24) General documentation for the Hyperliquid exchange can be found on this page: https://hyperliquid.gitbook.io/hyperliquid-docs
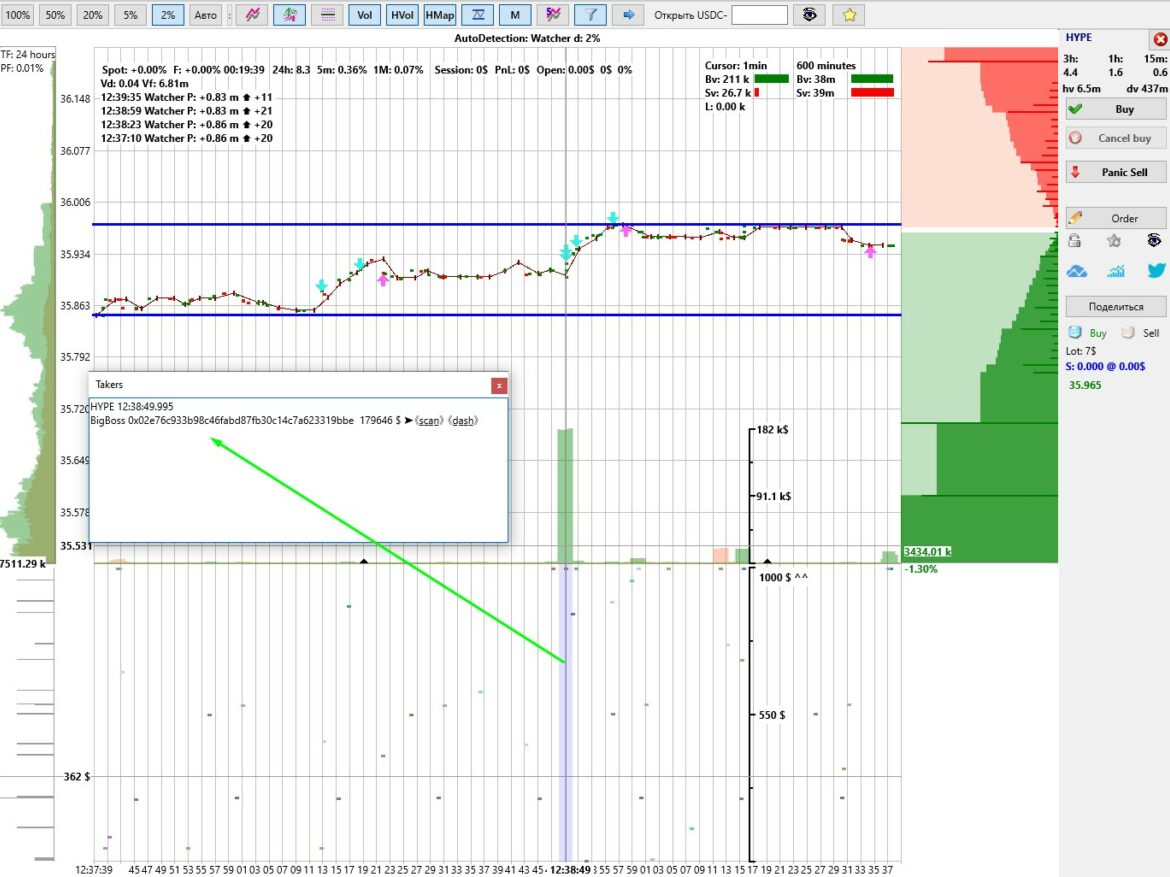
Heat map of trading addresses.
In the MoonBot terminal, which is connected to the spot or futures market of the Hyperliquid exchange, you can use the HMap button on the main terminal window to activate a heat map of trading addresses, which helps you track the trading addresses of other traders, indicating the coin name, date, and order size.
The height of the address heat map window can be adjusted in the HMap button menu using the Height slider.
You can zoom in or out on the address heat map data vertically using the mouse wheel if the cursor is in the map area.
You can zoom in or out on the address heat map data horizontally using the mouse wheel if the cursor is in the coin chart area.
On the right side of the address heat map, there is a general scale with volume, and on the left side, the order size at the set level will be displayed on the cursor line when it is moved vertically.
HYPE 12:38:49.995
BigBoss 0x02e76c933b98c46fabd87fb30c14c7a623319bbe 179646 $ ➤《s̲c̲a̲n̲》 《d̲a̲s̲h̲》
Decryption:
- HYPE - coin
- 12:38:49.995 - time of address ‘capture’ (on the vertical line of the cursor)
- BigBoss - address alias (written independently before the address with a space between them)
- 0x02e76c933b98c46fabd87fb30c14c7a623319bbe - trader's address
- 179646 $ - order size in $ (with plus or minus)
- ➤《s̲c̲a̲n̲》 《d̲a̲s̲h̲》- links to monitoring of this address on analytical websites (《s̲c̲a̲n̲》 on the website https://hypurrscan.io/ and 《d̲a̲s̲h̲》on the website https://hyperdash.info/ ).
The address ‘capture’ zone can be highlighted in blue if you tick the Measure Tool box in the Vol button menu and it has the same width, but with a coin chart that is stretched horizontally, it will contain fewer addresses with more precise definitions, and with a compressed coin chart, a larger number of addresses, so that you can quickly find out which group of addresses was more active or had significant order sizes, so that you can track them later.
The "capture" area can be highlighted in blue if you check the Measure Tool box in the Vol button menu. The "capture" area has the same width, but if the graph is stretched horizontally, it will contain fewer addresses with more precise definitions, while a compressed graph will contain a larger number of addresses, allowing you to quickly determine which group of addresses was more active or had significant order sizes so that you can track them later.
In the Takers window, you can specify an alias for the address before the address name, followed by a space, for example, BigBoss 0x02e76c933b98c46fabd87fb30c14c7a623319bbe. After closing the Takers window, this name will be saved to the text file "reference book of trading addresses and aliases" data\HLAddrBook.txt, in which data such as Address=Alias is saved in a column, for example, 0x02e76c933b98c46fabd87fb30c14c7a623319bbe=BigBoss. Aliases for addresses allow you to navigate faster when trading and identify the addresses you are tracking.
In addition, in the Takers window, you can select and copy the trading address, either by using the Ctrl+C combination (copy to clipboard) or by right-clicking and selecting Copy, in order to further verify its trading data on other third-party services.
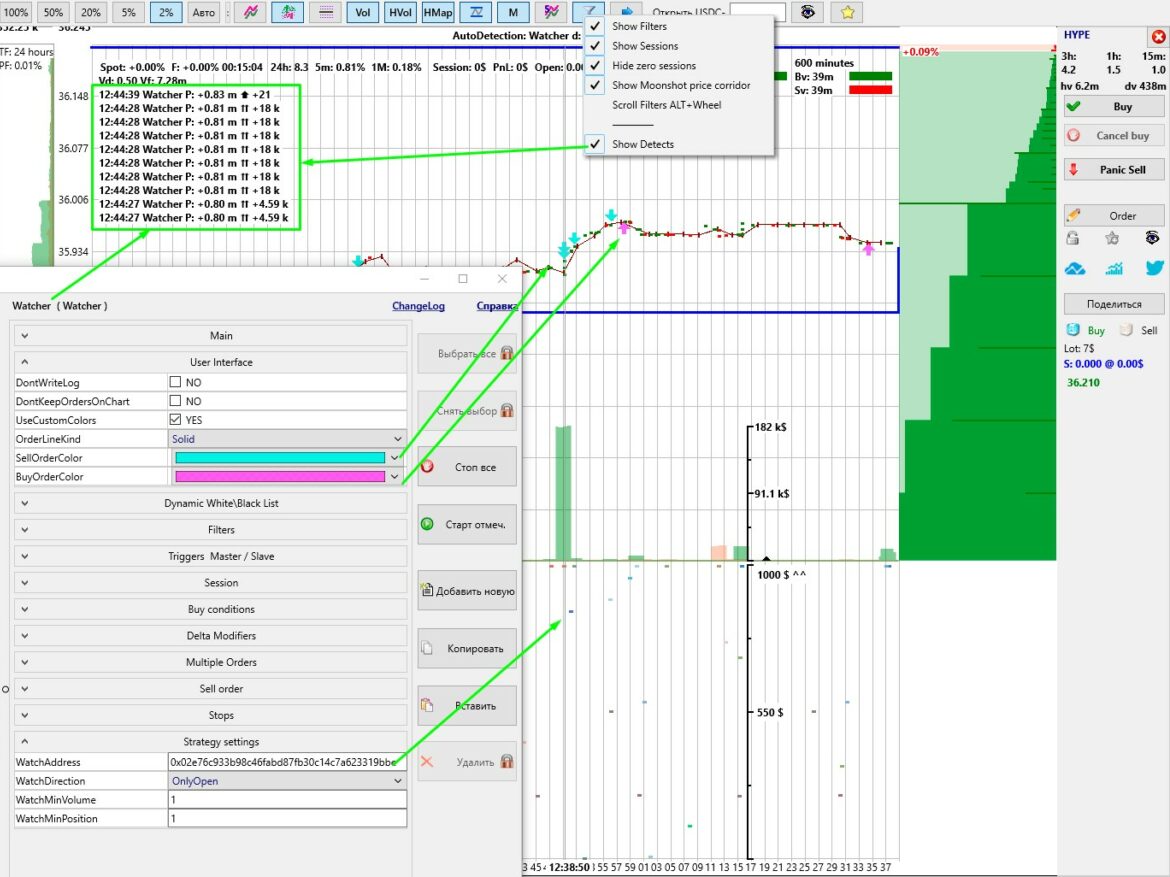
Watсher Strategy.
In the MoonBot terminal connected to the spot or futures market of the Hyperliquid exchange, you can create a special Watcher strategy, which, once launched, can automatically track the trading addresses specified in it, mark the activities of this trading address with arrows on the chart (up arrow - opening a long position or closing a short position, down arrow - opening a short or closing a long), the colour of the arrows is taken from the settings of the corresponding Watcher strategy on its User Interface tab from the SellOrderColor and BuyOrderColor parameters. Please note that by default, the Watcher strategy is created with the IndependentSignals=NO checkbox unchecked on the Main tab, so the top active Watcher strategy will be triggered. If you need several Watcher strategies to work simultaneously, you should check the IndependentSignals=YES box on the Main tab for each of them.
The Watcher strategy can also display data from 10 detectors on coin charts in the following format: Time Strategy name P: (position on the coin with a plus short or minus long) Arrows (bought up/sold down/opened/closed/taker/maker), Trade size (with a plus or minus). In the detector line, the taker is indicated by double thin arrows ⇊ or ⮅, the maker is indicated by a bold single arrow 🡇 or 🡅, i.e. there was a limit order that was bought out.
You can hide the display of detects from the Watcher strategy in the Funnel button menu by unchecking the Show Detects item.
The strategy settings tab of the Watcher strategy contains four parameters:
- WatchAddress: specify one or more trading addresses (you can specify more than 10 addresses separated by spaces) to track, for example, 0x02e76c933b98c46fabd87fb30c14c7a623319bbe. Since tracking a trading address is an active action (corresponding to the procedure of subscribing to the trades of the user who owns this address on the exchange), it requires a subscription button, which in the MoonBot terminal is combined with the "Start Checked" strategy launch button. Therefore, after adding or changing an address in this parameter, you need to click on the "Start Checked" button in the strategies window or in the Strategies button menu on the main screen of the MoonBot terminal.
- WatchDirection: a menu for selecting the direction of the position to track: in either direction Both / only on opening OnlyOpen / only on closing OnlyClose.
- WatchMinVolume: the minimum volume (in USDT) in a single order that can pass as well as a set of cross trades, below which it will not be detected.
- WatchMinPosition: minimum position volume (in USDT) that this address has accumulated for this coin, below which it will not be detected.