Getting started
Installation and Exchange Connection
In this section, you will learn how to install the Moonbot terminal and connect it to a cryptocurrency exchange to begin trading. We’ll walk through the key steps — from checking system requirements and installing the terminal to connecting it to an exchange using API keys. All instructions are written in a simplified format so you can easily prepare Moonbot for use, even if you have no prior experience with similar configurations.
System Requirements
The Moonbot terminal is designed to run on computers using the Windows operating system and is a portable application. This means that Moonbot is not installed into the system but is launched directly from its working folder.
To run and use Moonbot, the following is required:
Moonbot supports: Windows 7 (64-bit) and newer, Windows Server 2012 (64-bit) and newer. 32-bit versions of Windows are not supported. If you are using Windows 7 or Windows Server 2012, make sure all the latest system updates are installed.
Moonbot is not resource-intensive. Any computer suitable for everyday use — such as running a web browser, office programs, or standard applications — is sufficient.
If you plan to run Moonbot on a remote server, the recommended configuration is 2 vCores (CPU), 2 GB RAM. This ensures stable operation of the terminal and reliable API interaction with the exchange.
Moonbot requires a stable internet connection, as it connects directly to exchanges via API and exchanges data in real time.
Since Moonbot is a portable application, it must be unzipped into a dedicated folder before first launch. Do not place the terminal in system or temporary directories such as Windows, Program Files, Users, Temp, Downloads, Desktop. A recommended example is: C:\Moonbot. Also, avoid using Cyrillic characters or spaces in the folder path. Improper folder placement may lead to system-level restrictions or improper functioning of Moonbot.
Installing Moonbot on Windows
Installing Moonbot is simple and requires no special skills. Since it's a portable application, setup consists of downloading, extracting, and launching the program.
Where to Download the Terminal
ou should always download Moonbot from the official website to ensure that you’re getting the latest version and to avoid security or compatibility issues.
On the download page, you’ll find two versions of Moonbot:
This version is designed to help new users explore the terminal's features. You download a preconfigured Moonbot PRO archive that runs in emulation mode. In this mode, no real orders are placed on the exchange and no real funds are used. It's ideal for testing the interface and functionality without risk.
This version is a clean archive of the FREE version of Moonbot. After downloading and extracting it, you can connect the terminal to your exchange account using API keys and trade using your own funds. Later, you can upgrade to the PRO version if needed, or continue using the FREE version.
Choose the version based on your goals:
-
For exploration and testing — the demo version
-
For real trading — the clean version.
Installing the Terminal
To install Moonbot:
-
Download the Moonbot archive from the official site
-
Create a dedicated folder, e.g. C:\Moonbot
-
EExtract all files from the archive into this folder.xtract all files from the archive into this folder.
⚠️ Attention! The folder must not be located in system or temporary directories. Also, make sure the path contains no Cyrillic characters or spaces. This ensures stable saving of settings and proper operation of the terminal.
After extraction, Moonbot is ready to run — no additional installation is required.
First Launch
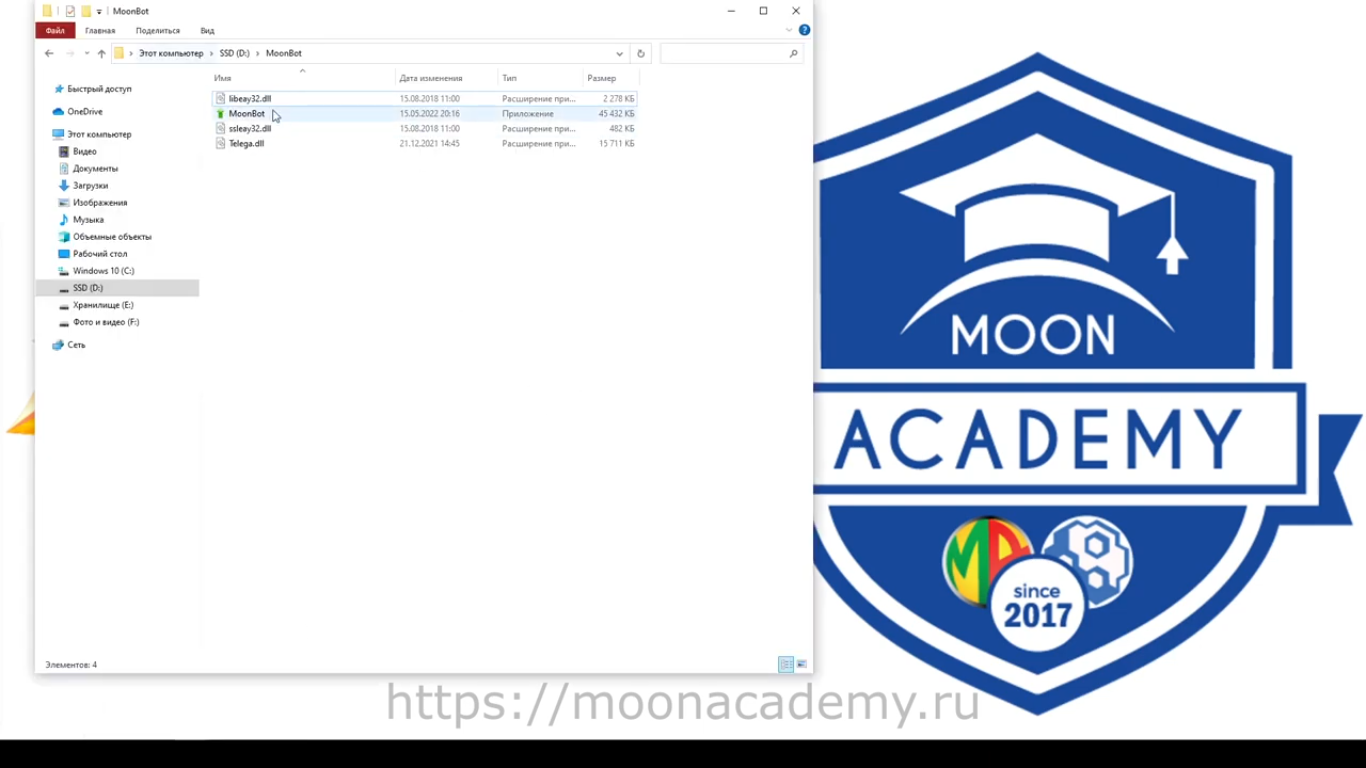
To start Moonbot open the folder where you extracted the files and launch the main executable file of the terminal. On first launch, Windows may request permission for network access — you must allow it, as Moonbot connects to exchanges via the internet.
After a successful launch, you will see the main terminal window. At this stage, Moonbot is not yet connected to an exchange and not ready for trading. The next step is to configure and connect your API keys, which we will cover in the following section.
Connecting the Terminal to an Exchange
To operate properly, Moonbot requires an exchange account and an active connection to a supported cryptocurrency exchange. All trading operations are executed through the exchange, while the terminal serves as a convenient tool for managing trades.
This section explains two key steps in sequence: first, creating an exchange account (using Binance as an example), and second, connecting Moonbot to the exchange via API keys. This order ensures that your exchange account is correctly set up and securely linked to the terminal for trading.
Creating an Exchange Account
To use Moonbot, you need an active account on a cryptocurrency exchange. Your funds are stored on the exchange, orders are placed there, and trading results are recorded on your exchange account. Without an exchange account, Moonbot cannot be connected or used for trading.
The Moonbot documentation uses Binance as an example, as it is one of the most popular platforms and is fully supported by the terminal. The process for creating an account on other supported exchanges is generally similar.
Creating an account typically involves registration, identity verification, and basic security setup. Once these steps are completed, your account is ready for funding and connection to Moonbot.
We recommend referring to the corresponding section in the Moonbot learning materials for a step-by-step guide on registering and preparing your exchange account.
Recommended resource:
Connecting Moonbot to the Exchange via API Keys
After your exchange account is set up, the next step is to connect Moonbot using API keys — a standard and secure method of linking trading terminals to exchanges.
API keys are special access credentials created in your exchange account settings and then entered into the Moonbot terminal. They allow Moonbot to interact with your exchange account within the permissions you define.
Using these keys, Moonbot can retrieve market data, access balance and order information, and place or manage orders. Importantly, API keys do not provide withdrawal access, meaning your funds remain fully secure and under your control on the exchange.
API keys are created in the exchange’s user dashboard. When configuring them, it is important to carefully set the required permissions and allow only the actions necessary for trading — this is a basic security best practice.
Once the keys are created, you need to enter them into the appropriate section of Moonbot's settings. After saving the keys, the terminal will verify the connection to the exchange. If the setup is correct, Moonbot will connect successfully and be ready for further configuration and trading.
Detailed step-by-step instructions for creating API keys and registering them in the terminal can be found in the Moonbot learning materials.
Recommended resources:
Common Errors When Connecting to the Exchange
When connecting the Moonbot terminal to an exchange via API keys, users may encounter common issues. In most cases, these problems are not caused by the terminal itself but by incorrect settings in the exchange account or insufficient preparation for trading.
If trading permissions or access to account data were not granted during API key creation, the terminal will not function properly. You must also ensure that withdrawal access is disabled, as Moonbot does not use or require this permission.
Both the public and secret API keys must be copied in full and without any changes. A missing character, extra space, or the use of expired keys may cause connection errors.
The API keys must be generated for the same exchange account that the terminal is being connected to. Deleted, deactivated, or restricted keys will prevent Moonbot from connecting.
To begin trading, your exchange account must have available funds. Balance top-ups are not performed within Moonbot — they must be done directly through the exchange’s own interface using one of the available deposit methods. If the balance is zero, Moonbot can still connect but will not be able to place trades.
In some cases, connection may be temporarily unavailable due to maintenance, regional restrictions, or additional security requirements enforced by the exchange. These limitations are unrelated to Moonbot itself.
If an error occurs during connection, it is recommended to first verify the API key settings, ensure they are entered correctly, and confirm that your exchange account is properly funded and ready for trading.
For a detailed walkthrough of the balance deposit process and account preparation, refer to the official Moonbot learning videos.
Summary: Installing and Connecting to the Exchange
In this section, you’ve completed all the technical steps required to begin using the Moonbot terminal. You reviewed system requirements, installed the terminal, and connected it to your exchange account. You also learned the basics of working with API keys and common mistakes that can occur during connection.
Once these steps are complete, your terminal is ready for further setup and usage. A correctly configured connection to the exchange is a crucial foundation for stable and secure operation of Moonbot.
In the next section, we’ll move on to the initial setup of the terminal and explain how to prepare Moonbot for your first trading operations and start working with its interface.
Learning Videos
For a clear, step-by-step visual guide to installing Moonbot and connecting it to your exchange, we recommend the following official video tutorials. Each of them walks you through the core actions described in this section.
Recommended video lessons:

📹 01 — Registering on Binance Exchange for Trading with Moonbot

📹 02 — Depositing Funds on the Exchange for Trading with Moonbot

📹 03 — Creating API Keys on the Exchange for Moonbot Trading
📹 04 — Installing the Moonbot Terminal