
API KEYS
Sign up for Binance using this link: https://accounts.binance.com/register?ref=joinmoonbot and get a free trial period (14 days) for the functionality of the PRO version of the MoonBot terminal.
(Activation is performed on the Settings - Unlock page after registering the keys in the terminal) .
Also, after registration via the link https://accounts.binance.com/register?ref=joinmoonbot upon activation of the PRO version, you can receive the following bonuses:
- 500 Moon Credits as a gift
- MoonAcademy coupon: for training video courses with unlimited views and access to a private Telegram chat with teachers for 1 month
- BNB auto-purchase option when trading USDT-M futures
- The MoonHook Strategy
- The price emulation tool on the chart using a "Pencil"
- Graph monitoring module in separate windows
Installing and launching the MoonBot terminal
1) Download the terminal archive on this page: https://moon-bot.com/en/download/
2) Create an empty folder on your computer and extract the contents of the downloaded archive into it.
Attention, recommendations for the installation and location of the MoonBot folder:
a) do not run MoonBot from the archive;
b) do not unpack the program on the desktop, in temporary and system folders such as windows, temp, users, etc.;
c) do not use Russian letters in the names of folders on the way to the terminal.;
d) if the computer has other disks besides system C, for example, such as D, E, and so on, then place the terminal folder on them. If the computer has only the C system disk, then place the terminal folder on this disk in a separate folder of the root directory, for example, in this C:\MoonBot .
3) In order to launch the MoonBot terminal, right-click on the file. MoonBot.exe and select the "Run as Administrator" option, this mode will increase the priority of the application on your computer, the clock accuracy will be normalized and the connection to the exchange will improve. When starting the terminal on a remote server (VDS), open the System Settings window via the Menu - System Settings, in which check the box next to the "VDS optimized mode" option and then overload the terminal in administrator mode.
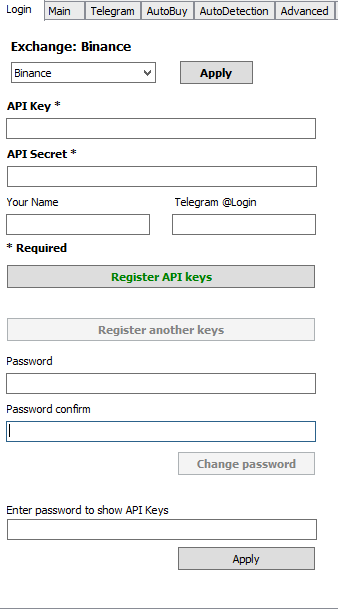
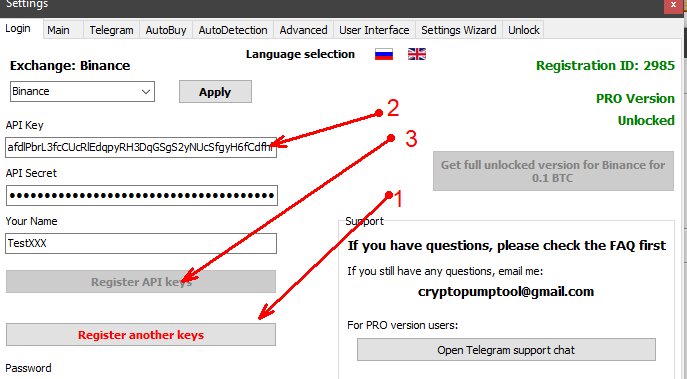
4) On the Settings-Login tab in the "Exchange" menu, select the desired exchange and enter the corresponding API keys from the exchange account in the API Key and API Secret fields below, then click on the "Register API keys" button and wait for the connection to the exchange. The procedure for obtaining API keys is described below. You do not need to re-enter the keys on subsequent launches.
API Keys
The MoonBot terminal interacts with the exchange via the exchange's API, and API KEYS are required to access the API. The first time you start the terminal, you need to enter the API keys. The keys consist of an API Key and API Secret pair.
The API Key is the public key that is used to register your copy of the terminal.
API Secret is a private key that is used to sign orders. The private key is stored locally on your computer in encrypted form in the BotConfig.bcfg file, which the terminal creates automatically.
Both API keys must be entered in the appropriate fields on the Settings-Login tab.
The private key is not transmitted to the Internet! For additional protection of the terminal, you can set a password, this password will be requested every time you start. The password is also used only locally.
Important!
Be sure to make backups of the terminal folder after registering the keys!
Backup is the only way to restore the keys if the disk is formatted and the system is reinstalled.
Binance API Keys Creation
To register the keys, go to the User Center — API Settings section on the Binance exchange website.

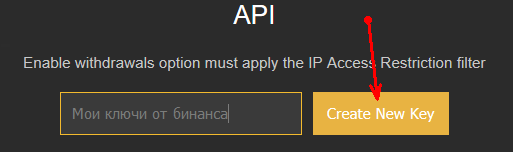
Enter the code from the e-mail and the 2FA authorization code.
After creating the API Key and API Secret, we recommend writing them down on paper or saving them to a file on a separate USB flash drive.
For security reasons, Binance will not allow you to re-view the API Secret in the settings, and if they are lost, you will need to create new API keys.
Attention!
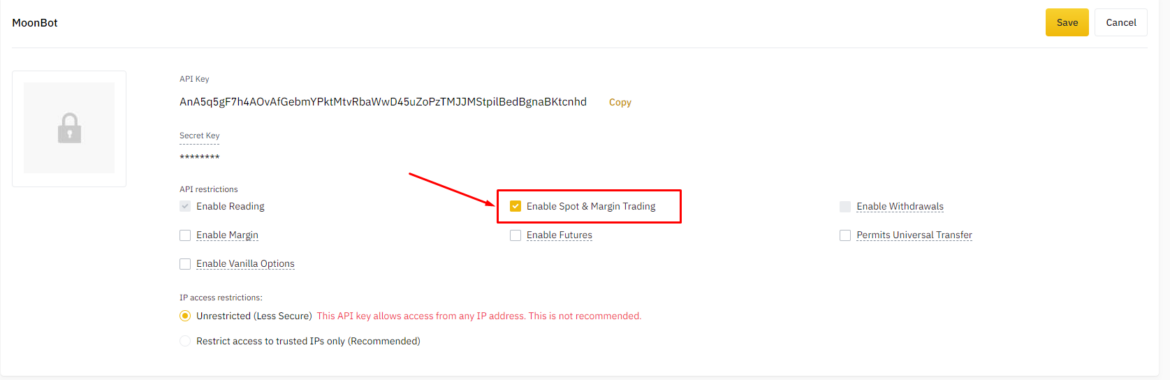
After creating API keys, you need to edit the permissions in them, in particular, be sure to check the box "Enable Spot & Margin Trading" and then save the changes with the necessary confirmation procedures, otherwise trading will not be available.
Important!
You also need to select "Restrict access to trusted IPs only (Recommended)" and specify the addresses where terminals with these API keys will operate. If this is not done, the permission for spot and margin trading will only be valid for 90 days. After that, in order to extend their validity for the next 90 days, you will need to re-edit the API key restrictions and check the box "Enable Spot & Margin Trading".
You can read more about this on the Binance exchange website.
MoonBot API keys input
To enter the new API keys into the MoonBot terminal, you need:
On the Settings-Login tab, select the Binance exchange from the "Exchange" menu.
Click on the "Apply" button.
Enter the API Key in the "API Key" field.
Enter the API Secreti n the "API Secret" field.
Click on the "Register API keys" button.
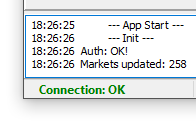
If the keys are entered correctly, the Bot will establish a connection with the exchange server, you will see your registration number in the settings window and status “Connection: OK” in the Bot’s main window.
If the connection could not be established, an error code will be displayed in the log window. In this case, double-check the API keys; make sure that the libraries are present in the system. libssl-1_1-x64.dll , libcrypto-1_1-x64.dll to check the stability of your Internet, check whether the Antivirus does not prohibit the terminal from accessing the Internet, go to the Settings-Advanced-Engine settings tab in the terminal and try other connection methods.
On subsequent launches of the MoonBot terminal, you do not need to re-enter API keys; the connection to the exchange will be established automatically.
Register another keys pair for the same or another exchange
If you plan to launch the MoonBot terminal for different exchanges at the same time, you can register API keys in the same terminal without copying it, and switch between exchanges using the exchange selection drop-down list. However, it is better to copy the terminal folder, select another exchange in the copy and register API keys from another exchange.
You may copy the terminal to another folder If you want to run 2 bots on different exchanges at the same time, or you can register new keys in the same bot and switch between exchanges using “Exchange” drop-down list (look picture below). To enter the new keys in the bot, please follow the next steps:
1) Make a copy of the PRO version of the MoonBot terminal.
2) Run a file from this folder MoonBot.exe in the administrator mode.
3) Make sure that you have launched a working PRO version of MoonBot with the same ID (registration number), which is displayed on the Settings-Login tab in the upper-left corner.
4) In the same place, on the Settings-Login tab, click Register other keys, enter new API keys instead of the current ones, and then click Register API keys. Make sure that there are no characters left in the API Key and API Secret fields from the previous API keys and that no space is captured at the end when copying new ones.
5) After that, the terminal with the new API keys will also become PRO.
Side Note:
- The MoonBot terminal is not installed into the system, but runs from its own folder, so you can store the terminal folder on a USB flash drive and run from it, or copy the folder to another computer and run the terminal on it. Copies of the PRO versions of the MooBot terminal can be run without restrictions.
- The free version of the MooBot terminal can only be run in 1 instance.