
AUTOMATED TRADING EXTENSION PACKAGE
The package contains the following additions:
- Spread strategy
- EMA filter and EMA strategy
- Additional MoonShot parameters for setting up repeated triggering
- A set of parameters for sessions management
This extension package can be activated in addition to the main product, using credits.
To open the credits menu, click on PRO Version in the bottom right corner or click on "MoonCredits" in the Settings menu (PRO tab) (available only if you own credits). Without activation, the functions of this package are only available in emulation mode, that can be enabled in MoonBot.
Spread strategy
The spread consists of active trades within a frame determined by time and price fluctuation.
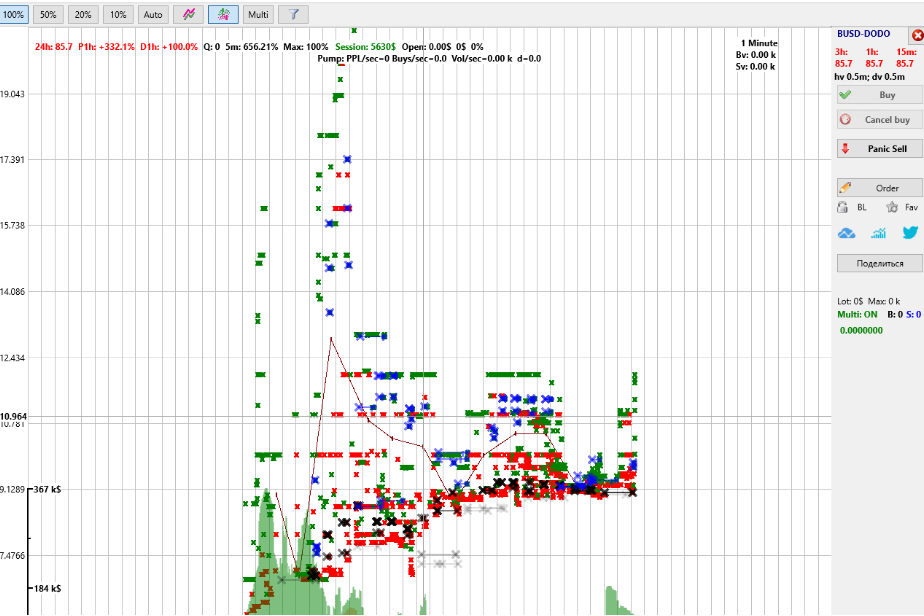
Examples of using the Spread strategy during the listing of DODO coin.
Strategy parameters:
TimeInterval: The width of the time zone in seconds used for calculations.
TradesDensity: The density of trades, in time, expressed in percent. For calculations, the interval is divided into bits of 200ms and the ratio of bits containing at least 2 trades at different price levels to bits without trades is calculated. i.e. a 100% density means that trades with different price levels have happened every 200ms.
TradesDensityPrev: The trade density prior to the detect. Helps determine coins that are flat. For pumps, this parameter should be set to 0 ! (as we are specifically looking for flat coins).
TradesCountMin: Every 200ms, within the entire detect interval, there are at least this many trades. Default value = 0. This parameter will strongly constrict detects, it will allow for only high trade density.
PriceIntervals: Number of equal intervals TimeInterval should be divided into to determine the fluctuation of the price. The total interval will be divided into a number of PriceIntervals, for every slice, the max, min and their delta (difference) is calculated.
PriceIntervalShift: Integer between 0 and 5. Cuts off detects of singular shots.
PriceSpread: Spread (in percent) used for the detect. The detect will occur if for every slice of the parameter described above, if the price fluctuation was higher than the PriceSpread.
IntervalsForBuySpread: How many of the last slices of PriceIntervals are to be used for calculating the min and max prices within the spread. If 0, the entire TimeInterval is used.
BuyPriceInSpread: at how many percent within the spread should the buy order be placed. If long – this percentage is calculated upwards of the min price; if short – downward of the max price. Example: 0% long will place an order on the min price within the spread; 50% will place the order in the middle; -100% short will place the order at two times the spread distance.
Attention! The BuyPrice parameter from the general BuyOrder section will also affect the buying price. BuyPriceInSpread in this case will determine the “base price” used to calculate the BuyPrice.
SellPriceInSpread: Similar to BuyPriceInSpread, a predetermined sell price based on the spread. Unlike BuyPriceInSpread, the sell price is made up of the maximum SellPrice and the spread sell price. i.e. if the SellPrice is lower than the spread (for example SellPrice=0) – the sell order will be placed within the spread. If higher – the sell is placed according to the SellPrice. (modifiers also affect the sell price).
BuyOrderReduce: sets the interval (in ms) used to calculate the average trade volume. The strategy will place an order of size not larger than the average volume. By default = 100ms. Volume calculation: sum of all trades (buy and sell) over the TimeInterval interval, divided by BuyOrderReduce. Examlple: if TimeInterval = 5 sec (5000 ms), BuyOrderReduce = 100ms, the volume over 5 sec was 10 000$, the average volume over 100ms will equal 10000/5000ms*100ms=200$. In this case the strategy will place an order not larger than 200$.
Alternatively, knowing the average volume over 100 / 10/ 5 ms, this will be the maximum order size of the strategy
BuyOrderReduce=0 – parameter is turned offThe work of the order reduction function can be seen in the following inscription:IOTA: [1] (40) Buy order reduced: 1000.00$ => 23.32$ (Vol: 23.32$)In this log, the OrderSize in the strategy was 1000$, but the average volume over 100ms was just 23$, thus, the strategy has placed an order of 23$.
SpreadRepeatIfProfit: The repeated placement of buy orders during 1 sec after the detect (not later). The repeated order is placed if the current price has approached the sell price by more than the SpreadRepeatIfProfit percent. If 0, repeated orders are not placed. If 100, is placed only after selling the sell order (not more than 5 repeated orders, based on internal limitations).
SpreadFlat: if YES, the bot will try to determine the spread in a horizontal channel.
Spread_BV_SV_Time: time in terval (in milliseconds) for analysis. If 0 — parameter is ignored
Spread_BV_SV_Max: buys to sells ratio not greater than this value. If 0 — parameter is ignored
Spread_BV_SV_Min: buys to sells ratio not smaller than this value.
If the strategy contains a short, the relationship is inversed automatically! (i.e. the short calculates the ratio of sells to buys).
Example: Spread_BV_SV_Time = 1500 (1.5 seconds)
Over the last 1.5 seconds, 500$ worth of buy trades and 1000$ worth of sell trades were recorded. The ratio bv/sv will equal 500/1000 = 0.5 for longs and 1000/500 = 2 for shorts
SpreadPolarityMin: Minimal range of spread polarity. Polarity - the direction, a numerical value of the price direction from +100 (strictly up) to -100 (strictly down).
SpreadPolarityMax: Maximum range of the spread polarity.
Example
TimeInterval =5 sec.
TradesDensity=100
PriceIntervals = 5
PriceSpread = 0.3%
IntervalsForBuySpread=2
BuyPriceInSpread=5
SellPriceInSpread=100
BuyOrderReduce = 100
This means that over the last 5 seconds, every second a price variation of 0.3% (or higher) was recorded. To calculate the buy and sell orders we use the last 2 intervals (IntervalsForBuySpread=2), we set the buy order at +5% from the minimum value, and the sell order at max(100%). Yet if volume over 100ms is smaller than the OrderSize strategy, an order equal to the volume will be placed.
Attention! The Spread strategy implies a very high level of risk. Use it without auto-buying, as a detect, to understand the way it works. Once you have a good grip on how it works, use it for real trading.
Note:
- It is VERY important to use Latency filters in the strategy, because the value of prices used for the detecting the spread are taken from the trades (ticks on the chart). If the prices will arrive with a delay, the detect might work when the price is no longer available!
- When a buy order is partially filled the strategy will remove it and the entire executed volume is sold, similar to MoonShots.
- The detect conditions calculations are made once every ½ second.
- The strategy takes into account the detect modifiers (the modifiers affect the PriceSpread).
- It is recommended to use this strategy with the EMA filter, short (for example EMA(30,2) to determine the increase or decrease and placing a high sell on a short or long (setting up EMA is described further).
- Reading the detect parameters from the chart: Settings – Special, check the box Extended Debug.
- If you have several "Spread" strategies running, the detect and order will work for each of them (unlike other types of strategies where the detect works works for the first one on the list).

Definitions:
TD: trade densityd
P: price fluctuation on the entire interval TimeInterval
Vol: volume
Spread: actual spread, percent
N: number of slices showing the spread (the last two appear on the chart only at detect time)
These values can also be found in the detect report:

EMA filter and strategy
The new CustomEMA parameter in the strategy allows the creation of a custom filter based on price comparison.
The parameter takes a string of functions for comparison as shown here:
EMA(X,Y) > A AND EMA(p,q) < B AND …. any number of formulae separated by the words "AND" or "OR" (with algebraic order: first AND, then OR. Example: A AND B OR C AND D means that either (A AND B) or (C AND D).
Formulae:
EMA(X,Y) > or < A: compares the prices for EMA X seconds, minutes or hours ago and EMA Y seconds, minutes or hours ago (allowable values X=1s...300s or 2m...90m or 1h...41h, Y=1s...300s or 2m...90m or 1h...41h).
MAX(X,Y) > or < A: Compares the maximum price for X minutes or hours ago and EMA Y seconds, minutes or hours ago (allowable values X=5m...90m or 1h...41h, Y=1s...300s or 2m...90m or 1h...41h). For an explanation of the calculation of highs and lows, see "Calculation Methodology" below.
MIN(X,Y) > or < A: Compare the minimum price X minutes or hours ago and EMA Y seconds, minutes or hours ago.
Allowable values X=5m...90m or 1h...41h, Y=1s...300s or 2m...90m or 1h...41h.
For an explanation of the calculation of highs and lows, see "Calculation Methodology" below.
BTC(X, Y) > or < A: Compares the BTC/USDT prices for EMA X seconds, minutes or hours ago and EMA Y seconds, minutes or hours ago.
Aallowable values X=1s...300s or 2m...90m or 1h...41h, Y=1s...300s or 2m...90m or 1h...41h.
MAvg(X,Y)> or < A: Comparison of the average prices of the entire market EMA X seconds, minutes or hours ago and EMA Y seconds, minutes or hours ago.
Allowable values X=1s...300s or 2m...90m or 1h...41h, Y=1s...300s or 2m...90m or 1h...41h.
The calculations of the average Market price is affected by two settings:
1) Settings -> Main, "BL remove from delta" - if this box is checked, the average market price calculations will disregard the BL markets
2) Settings -> Special, "Weighted mAvg" - if the box is checked, the average market price weighted based on the daily volume
Meaning that the lower the daily volume on a coin the less it will affect the average price.
The calculation can be compared to the capitalization: sum (price*volume).
Avg(X, Y) > or < A: format is similar to EMA(X, Y). The price X sec. or min. ago and Y sec. or min. ago are compared.
If Y=1, the current price is taken. The average price line can be seen on the chart by ticking the Show Avg Price checkbox.
Vol(X,Y) > or < A: volume comparison formula to EMA formulas. X,Y can be: 5s, 15s, 30s, 1m, 3m, 5m, 15m, 30m, 1h, 3h, 24h
The calculation is done using the formula: (average minute volume per hour Y) divided by (average minute volume per hour X).
Example: Volume per hour 120000 USDT (average minute volume per hour will be 2000 USDT).
Volume for the last minute: 4000 USDT
Then Vol(1h, 1m) = 4000/2000 = 2, i.e. the volume in this minute is 2 times the average minute volume for the last hour.
Special case: Vol(0, Y) just gives the average minute volume for time Y, without comparison.
Every formula EMA(X, Y) > or < A means:
1) X,Y – time: date followed by the letters s, m or h (seconds, minutes, hours) or no letters (the date is then calculated in seconds)
2) the greater than or less than sign (<,>)
3) A – what to compare with (in percent )
Calculation principle: average price Y seconds ago compared to the average price X seconds ago:
Price(Y) / Price(X) > 1 + A / 100
Alternatively, Price(Y) greater than Price(X) by A percent (or less, if the formula contains the < symbol).
Calculation methods and limitations:
Because it is impossible to keep all possible combinations in memory, the bot calculates the prices as follows:
- A set of per second averages from the current price(1 sec) to 300 sec. age. Calculated using average prices for each second, like classic EMAs: Pnext[N] = (Pprevious[N] * N + Pcurrent) / (N + 1), where N is the time in seconds.
- Minute averages from 2 to 90 minutes ago. Calculated simply as the average price per minute
- Hourly averages from 1 to 41 hours ago (exchange limitations exist) (is calculated as the average price of the 5м candles) Thus, the X,Y parameters in the EMA formula may be: 1..300 or 2m..90m or 1h..41h
- If Y is 1s the comparison will be made with the current price
- Recalculation of hourly max/min is performed every 5 minutes, as a new 5m candlesticks appear. To avoid doubling of MAX(1h)/MIN(1h) and MAX(60m)/MIN(60m) records, the hourly ones are recalculated from 1 hour ago. For example, MAX(1h,1) is taken by 5 minute candlesticks from 60 to 120 minutes ago.
- Recalculation of minute MAX/MIN is carried out every tick (1 tick = 2 sec), i.e. with a delay from 2 to 4 sec. At the same time, the last 60 seconds are not included in the calculation of the levels of minute MAX/MIN.
Thus, a sharp increase at the last minute (for minute intervals) and during the last 60 minutes (for hourly intervals) is not considered in calculating MAX/MIN levels and, therefore, in a moment the max value can be more than zero and min less than zero. It is done in this way to be able to give create a higher-high/lower-low using the formula (i.e. to write a condition that the current price has become higher than the maximum or lower than the minimum over the last N minutes/hours).
These prices can be displayed on the chart using the control panel as shown bellow ,
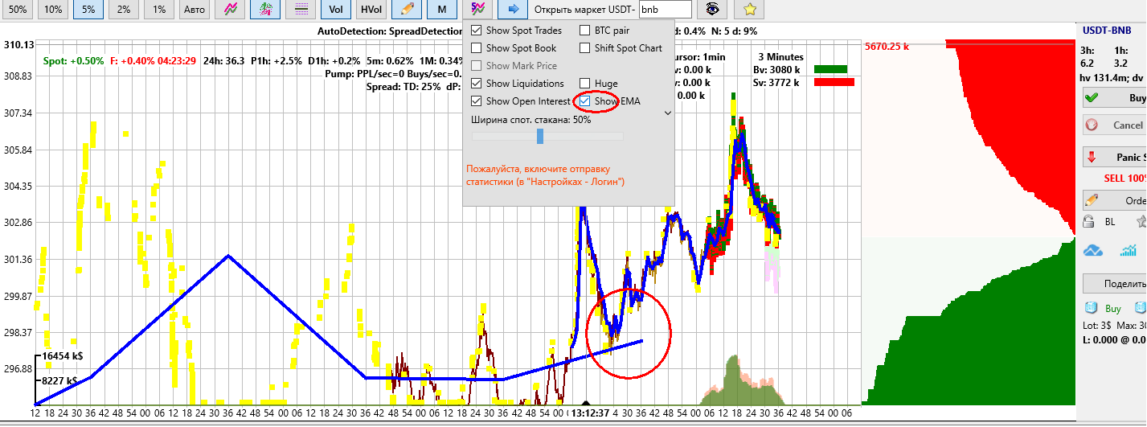
ATTENTION! This is not an indicator, rather just a demonstration of how the new EMA filter is calculated. For reasons, presented above, the blue price line may have ruptures – these are the places where 300s end and the 2m starts and the 90m ends.
The CustomEMA filter will work when all conditions from the formula are met. Thus, various entry conditions can be set, specifically trailing buy: the price decrease over a long period with the later increase for a short period etc.
Examples of values in the CustomEMA field:
1) EMA(15m,3)< -1 and EMA(5,1) > 0.1
EMA(15m,3)< -1 = means that there was a decrease: the price 3 seconds ago -1% less than the price 15 minutes ago.
EMA(5,1) > 0.1 = means the price increased: the current price is 0.1% higher than it was 5 seconds ago.
Together, these conditions mean that the detect will take place after a fall that is followed by an increase.
2) MAX(1h, 1s) > 0.1 = denotes an over-high: the current price has gone higher than the max of the last hour
3) MAX(1h, 1s) < -5 = denotes a 5% fall from the high of the last hour
4) MAX(1h, 1s) < -5 AND MIN(1h, 1s) < 0.1 AND MIN(1h, 1s) > -0.1 = denotes a 5% fall from the high and are currently located near the bottom
For ease of testing, a new EMA strategy is added, that doesn’t contain parameters, it is built exclusively for detecting the conditions of CustomEMA filter. Thus, the detect will take place the moment when the filter conditions are met, so use it with caution! Unlimited buys are possible, set a NextDetect penalty.
Note:
- It is important to use Latency filters in the strategy because the EMA prices depend on the trade prices, if the trades arrive with a delay the EMA calculations will be erroneous.
- The EMA lines are saved in the reports at the moment of the detect. For moonshots – at the moment the buy orders are executed (if the strategy had the EMA filter enabled).
Additional parameters for the MoonShot strategy
In addition to the basic parameters, a few new ones are added that will broaden the MoonShot algorithm possibilities. Now the strategy can repeatedly place a shot on the same coin before the sell of the previous sell order:
MShotRepeatAfterBuy: Place a repeated MoonShot after buying and placing the sell.
MShotRepeatIfProfit: %, a condition for the current price for the repeated shot: the price should be higher than the buy price by this value.
MShotRepeatWait: time in seconds, during which the repeated shot may be placed if the condition of MshotRepeatIfProfit is met.
MShotRepeatDelay: await time in seconds, before placing a repeated shot.
The repeated shot is only placed if the current price is higher than the price of MShotRepeatIfProfit percent value during MShotRepeatWait seconds.
The default value of MShotRepeatIfProfit = 0, MShotRepeatWait = 5 mean:
"Place a repeated shot if the current price went higher than the buy price within 5 seconds from the buy"
“Trigger” parameters within strategies:
how the triggering of one strategy launches the next one.
Triggers are available only when the AutoTrading Extension module is active or inside the Menu → Emulator mode.
Master strategy parameters:
TriggerKey: from 0 to 200, if 0, not used.
Is the activation key for Slave strategies based on the trigger. The trigger will start on the market that generated the signal.
E.g.: Take a Master strategy with the TriggerKey = 5. When activating this strategy (the activation conditions for each strategy type are described below in the “Trigger functional specifics” section) the key 5 registers the current time. Then, all Slave strategies using the TriggerByKey = 5 parameter will become active and will be active for a period (in sec.) that is given by the TriggerSeconds parameter used in the Slave strategy or, for the duration of the value after the equal sign in the KEY=TIME parameter (see description below).
TriggerKeyBuy: from 0 to 200, a key to be triggered when a buy order is filled. For Moonshots, TriggerKey is replaced by TriggerKeyBuy.
TriggerKeyProfit, TriggerKeyLoss: from 0 to 200, if 0 -- not used.
Allows the activation of up to 200 keys depending on the direction of the closed trade (profit or loss) as follows:
a) if the trade recorded a profit, the key from the TriggerKeyProfit parameter is used.
b) if the trade recorded a loss, the key from the TriggerKeyLoss parameter is used.
ActiveTrigger: YES / NO (default = NO)
Keep a trigger signal (on the TriggerKeyBuy key for moonshot or on the TriggerKey key for other strategies) while there is a buy order.
ClearTriggersBelow: on signal on key N, clear all keys with numbers less than N
ClearTriggersAbove: when signaled on key N, clear all keys with numbers greater than N
ClearTriggerKeys: A space separated list of keys, after receiving the trigger signal, clears all given keys.
TriggerAllMarkets: YES / NO (default = NO)
If YES, trigger is applied instantly to all markets.
If NO, trigger is applied only to the market that issued the signal.
Slave strategy parameters:
TriggerByKey: a row with key numbers separated by a space, if the row is empty, the parameter is not used.
What key of the Master Strategy should be used for signal that will launch the Slave strategy. More keys can be added separated by a spec or give your own time interval (in sec.) using the format KEY=TIME.
E.g.: TriggerByKey 1 2 3 4=100 5 6 7=300 means that the strategy will be launched using keys 1, 2, 3, 4, 5, 6, 7. The times for the keys are as follows:
a) 1, 2, 3, 5, 6 will be set using the value in parameter TriggerSeconds
b) 4=100 will use a custom interval given after the equal sign (100 sec.)
c) 7=300 will use a custom interval given after the equal sign (300 sec.)
TriggerByAllKeys: if YES, then the slave strategy will only be triggered if all TriggerByKeys are active.
TriggerSeconds: time in seconds, if 0 -- parameter is ignored.
For how many seconds should the Slave strategy be run after receiving the trigger signal and the key activation, listed in the TriggerByKey parameter, without the equal sign.
E.g.: if the Master strategy is triggered and key 1 is activated from parameter TriggerKey=1, any Slave strategy that contains the key 1 in the TriggerByKey=1 parameter will be launched for a period of time equal to the value of the parameter TriggerSeconds=60 form the Slave strategy. In this case, the strategy will be active for 60 seconds, will then go into standby and will not be active until the next trigger for key 1 occurs.
TriggerKeysBL: a row with key numbers separated by a space, if the row is empty, the parameter is not used.
What key of the Master Strategy should be used for signal that will stop a Slave strategy by adding the coin to the BlackList. More keys can be added separated by a spec or give your own time interval (in sec.) using the format KEY=TIME.
E.g.: TriggerKeyBL 1 2 3 4=100 5 6 7=300 means that the strategy will be launched using keys 1, 2, 3, 4, 5, 6, 7. The times for the keys are as follows:
a) 1, 2, 3, 5, 6 will be set using the value in parameter TriggerSecondsBL
b) 4=100 will use a custom interval given after the equal sign (100 sec.)
c) 7=300 will use a custom interval given after the equal sign (300 sec.)
TriggerSecondsBL: time in seconds, if 0 -- parameter is ignored.
If one of the TriggerKeysBL keys was triggered on a coin, the strateg on this coin will sleep for TriggerSecondsBL seconds.
SellByTriggerBL: set as a string of keys (space separated) (keys must be a subset of TriggerKeysBL; a coin will be sold only if its blacklisted by a trigger)
CancelByTriggerBL: cancel orders, if the BL was triggered (similar to CheckAfterBuy applied to triggers).
Specifics of Trigger workings:
- Manual strategy activates the key if:
1) a Buy order is placed from the TriggerKey parameter, if the ActiveTrigger=YES checkbox is checked
2) a trade is closed by the TriggerKeyProfit and TriggerKeyLoss parameters, and additionally:
а) if a trade records a profit, the key will be activated from the TriggerKeyProfit parameter (e.g.: if TriggerKeyProfit=1, key 1 will be activated)
b) if a trade records a loss, the key will be activated from the TriggerKeyLoss parameter (e.g.: if TriggerKeyLoss=2, key 2 will be activated)
c) if the activation is needеd regardless of a loss or profit, the recommendation is to give the same value to both TriggerKeyProfit and TriggerKeyLoss parameters. E.g.: For TriggerKeyProfit=3 and TriggerKeyLoss=3, regardless of a profit or loss, key 3 will be activated.
If the parameters’ value will be set to zero (TriggerKeyProfit=0 and TriggerKeyLoss=0), the Manual strategy will not activate keys based on closed trades.
- other strategies will activate keys from the TriggerKey parameter based on a signal (even without auto-buy). Yet these can still activate keys from the TriggerKey parameter when a Buy order is placed if the ActiveTrigger=YES checkbox is checked.
For convenient trigger management: reset, launch and simply analysis of which triggers are specified in which strategies, use the manual trigger management menu (main menu, Manage Triggers at the bottom)
Session management parameter set
General concept description:
- A strategy's profit is aggregated and increment the profitable session counter.
- A strategy's losses are aggregated and increment the negative session counter.
- Every profitable session resets the previously aggregated negative sessions (and vice-versa, the negative session resets the positive session counter)
- The negative session enables the penalty and optionally reduces the order size.
- Profitable sessions optionally increase the order size
General notes:
- Session settings are accounted separately for each market and strategy. Each strategy has its own unique session value per market.
- The sessions are always monetized in USDT, including for BTC bots.
- The session changes at closing (execution of sell orders)
- The manual reset of the general session also resets new sessions based on markets.
- To view the value of the session on the chart, enable "filters on chart". You will then be able to view those strategies that use the IgnoreSession = NO parameter.
- A sell executed by SellByFilters parameter is not accounted for in the session.
- Session settings work independent of IgnoreFilters. I.e. even if you enable ignoring of filters, but a coin has a session penalty, the order will not be placed.
- All strategies that have triggered buys and those that are expected to sell, will change the session after the closes of the Joined order by the amount of the total profit.
- The information on the actual order size (according to the SessionReduceOrder, SessionIncreaseOrder settings) can be found in the reports commentary (if the orders were not joined)
Parameter description:
IgnoreSession: YES \ NO - if YES, ignores all session settings (default).
SessionLevelsUSDT: (YES\NO) If Yes, then SessionStratMax and SessionStratMin are set in USDT, if NO, then as a percentage of OrderSize (by default YES)
SessionStratMax: Profitability threshold (in USDT), e.g. 200$. When the strategy reaches +200$, the profitable sessions counter is incremented, the negative session counter is reset, the current profit value is reset, the strategy will continue working using an increased order.
SessionStratIncreaseMax: Profitability threshold increase for SessionStratMax in percent. The value of the threshold will be automatically increased with each profitable session, starting with SessionPlusCount. If SessionStratIncreaseMax = 0 or SessionPlusCount = 0, the parameter is ignored.
For example: the threshold is 200$, the percentage increase is = 20%, SessionPlusCount = 3. In this case, starting with the 3rd profitable session, the threshold will be increased by 20% and will equal 240$.
The threshold is increased linearly using this formula: SessionStratMax * ( 1 + (Counter - SessionPlusCount + 1) * SessionStratIncreaseMax / 100).
For example: SessionStratIncreaseMax = +20%, SessionPlusCount = 2, and the 5th profitable session is rolling, in this case the threshold is increased by +200+20% * (5 - 2 + 1 = 4)= 200 + 80% = 360$.
SessionStratMin: The loss threshold (in USDT) is a negative value, e.g. -100$. When the strategy accrues -100$, the negative session counter will be incremented, the profitable sesion counter will be reset, the current текущее profit value will be reset, the strategy will be stopped for a time penalty equal to SessionPenaltyTime.
In this case, after the session is reset, orders opened by this strategy before the halt can be closed. In this case the session can again accrue a loss and will renew the time penalty.
SessionStratReduceMin: the percentage reduction of the loss threshold of SessionStratMin (positive value). The threshold value will automatically reduce with each negative session starting with SessionMinusCount.
For example: the threshold reduction percentage = 30%, SessionMinusCount = 3, SessionStratMin = -100$. If you have logged the 3rd consecutive negative session, the loss threshold is decreased to SessionStratMin =-100 / 30%=-77$.
The threshold reduction is calculated using the formula: SessionStratMin / ( 1 + (MinusCounter - SessionMinusCount + 1) * SessionStratReduceMin / 100);
For example, in case of SessionStratReduceMin = 30% and a base SessionStratMin = -100$, after the second negative session the threshold becomes 100 / (1 + 2 * 0.3) = 100 / 1.6 = 62.5
If SessionStratReduceMin = 0, the reduction is ignored.
The current actual thresholds can be viewed on the chart if “filters on chart” is enabled, the values of sMin and sMax.
SessionResetOnMinus: YES \ NO. - if YES, resets the current session profit to 0 after a negative trade (if the profit of the current session is positive and the loss is negative, trades larger than SessionStratMin/10).
SessionPenaltyTime: Time in sec., during which a strategy will not work following a negative session.
SessionPlusCount: a counter of consecutive profitable sessions starting with which the order size (according to the SessionIncreaseOrder parameter) and the sesion threshold (according to the SessionStratIncreaseMax parameter) will be increased. If a negative sesion is recorded, the counter is reset to zero.
SessionMinusCount: a counter of consecutive negative sessions starting with which the order size (according to the SessionReduceOrder parameter) and the sesion threshold (according to the SessionStratReduceMin parameter) will be decreased. If a profitable sesion is recorded, the counter is reset to zero.
SessionIncreaseOrder: order size increase percentage based on the increase in profitable sessions count starting with session number SessionPlusCount (positive value). If SessionPlusCount = 0 or SessionIncreaseOrder = 0 , the parameter is ignored.
For example: SessionPlusCount = 5, SessionIncreaseOrder = 10. Starting with the 5th profitable session the order will be increased by 10%.
The order size is increased exponentially: first increase = +10% of 100, second increase = +10% from 110, and so on. To view the actual order increase, see log entry: LINK: [1] (28) OrderSize increased by 33.10%: 100.00$ => 133.10$
SessionIncreaseOrderMax: The maximum limit for order size increase in percent based on the original OrderSize (default 500% = 5 times)
SessionReduceOrder: order size reduction percentage based on the increase in negative sessions count starting with session number SessionMinusCount (positive value). The order is decreased exponentially, by dividing by a percentage.
The first reduction = 100 / (1 + 20%) = 83.3$. The second reduction = 83.3 / (1 + 20%) = 69.4$, and so on.
To view the actual order reduction, see log entry: LINK: [1] (28) OrderSize reduced by 20.0%: 100.00$ => 83.3$
SessionReduceOrderMin: The maximum limit for order size reduction in percent based on the original OrderSize (default 500% = 5 times)
SessionResetTime: The interval (in sec.), after which an auto-reset of session counters occurs. Once in SessionResetTime sec., the profitable and negative session counters are decreased by 1, while the profit value is decreased by 10% (i.e. if the strategy is not working on a coin, with time, its session is reset to zero)